Sly Cooper: Thieves in Time Trophy Guide – HTG


Thumby’s Road to the Platinum
Step 1: Complete the game while going for the Navigate Like Drake Trophy
Step 2: Gather all Collectibles
Step 3: Beat the Arcade Machine High Scores
Step 4: Collect all Miscellaneous Trophies
For PS VITA Owners:
If you have a vita that also has Sly Cooper: Thieves in Time you can use the AR feature on you VITA and hold it up to your television screen to make it incredibly easy to find collectibles.

Mask and Stripes Forever – Collect every bronze, silver, and gold trophy. (Platinum)
Collect all the other trophies to unlock the Platinum trophy. Congratulations!!!

Family Matters – Rescue Sly’s long lost Cooper relative in Episode 1. (Bronze)
Story Related Cannot Be Missed. This will unlock upon completion of the job “Breakout!” In Episode 1.

Low Calorie Sushi – Complete all the jobs and beat the boss in Episode 1. (Bronze)
Story Related Cannot Be Missed. This will unlock after defeating the boss during the job “Altitude Sickness” in Episode 1.

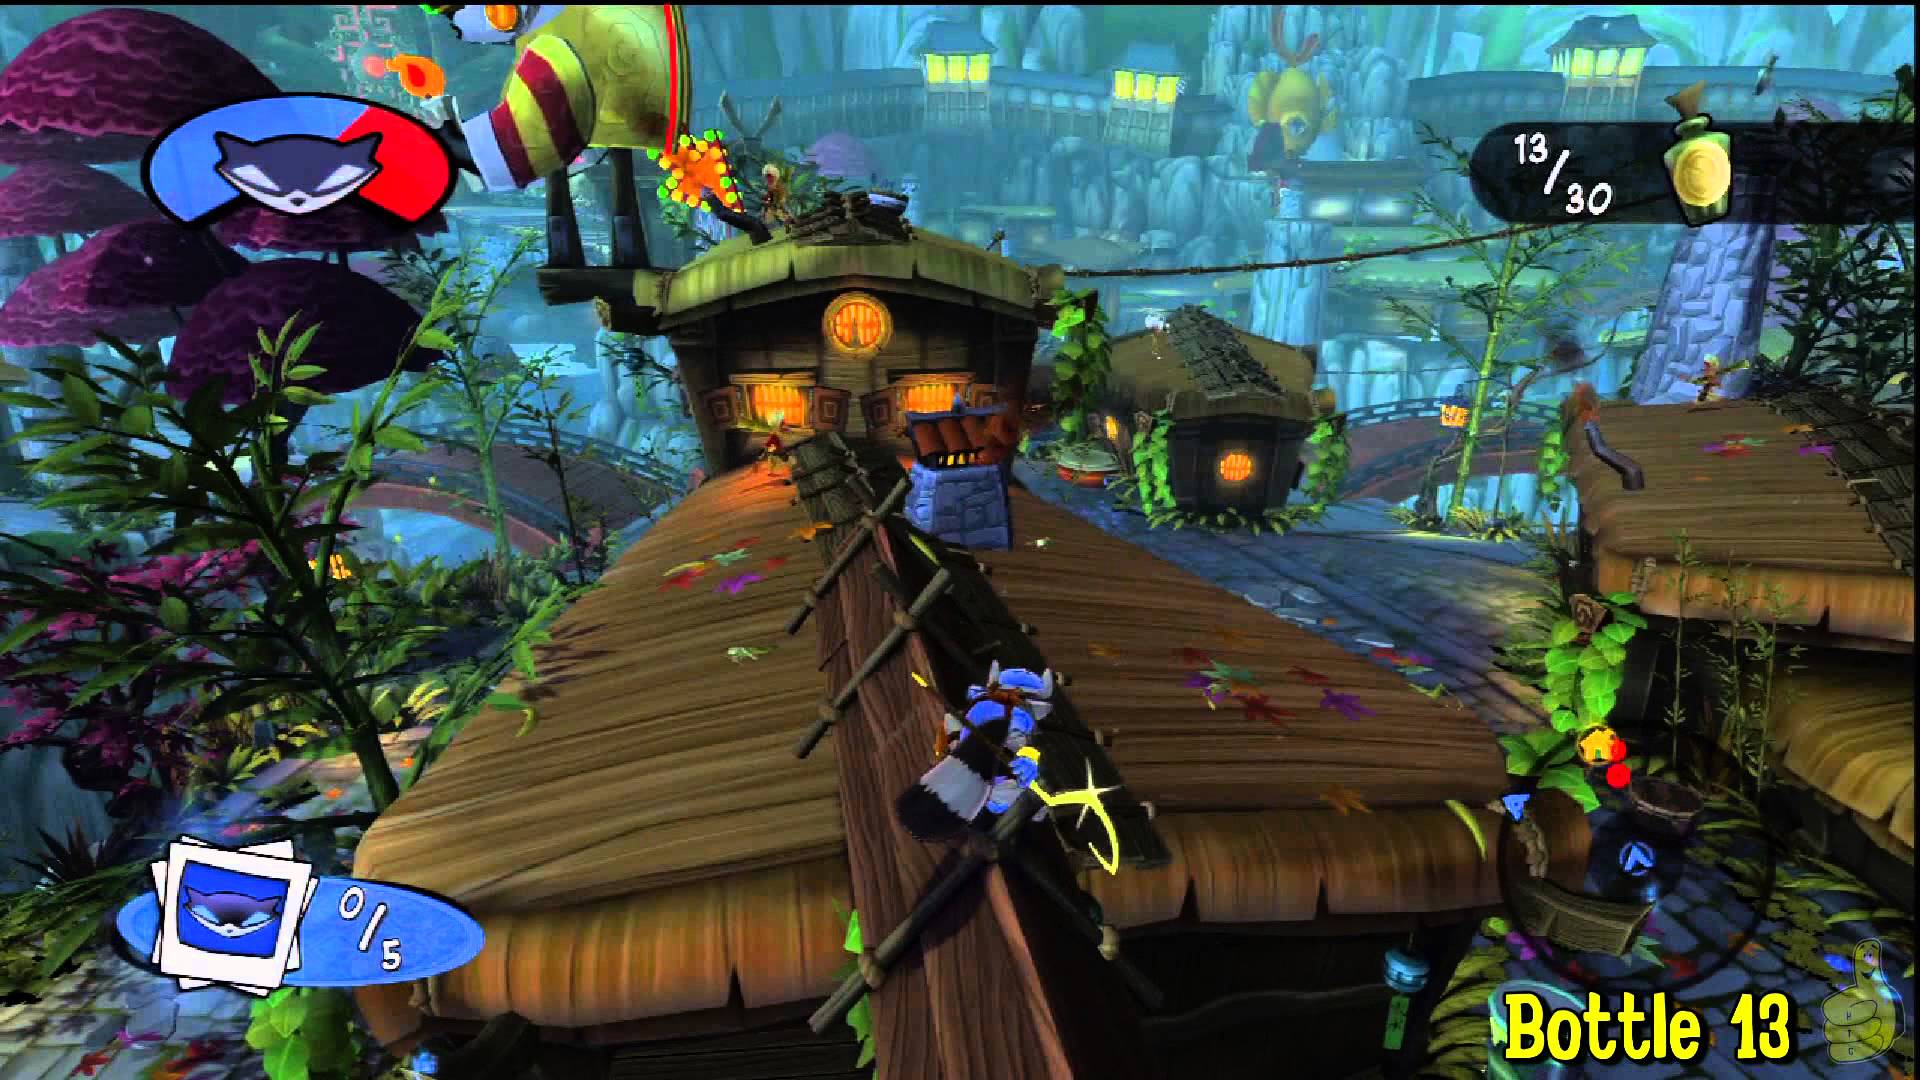
Play it Safe – Unlock the Cooper Safe in Episode 1. (Bronze)
Once you collect all 30 bottles, open the safe and the trophy will pop. After you collect all the bottles and open the safe in Episode 3, the item given to you will make all remaining bottles appear on your map/mini-map.
For a map of all the bottles:
Feudal Japan Bottle Locations Map

Gunslinger – Reunite with Sly’s long lost Cooper relative in Episode 2. (Bronze)
Story Related Cannot Be Missed. This will unlock upon completion of the mission “Jailhouse Blues” during Episode 2.

Dust Bunnies – Complete all the jobs and beat the boss in Episode 2. (Bronze)
Story Related Cannot Be Missed. This trophy will unlock upon beating the boss during the mission “Operation Gold Digger” at the end of Episode 2.

Put it in Your 401K – Unlock the Cooper Safe in Episode 2. (Bronze)
Once you collect all 30 bottles, open the safe and the trophy will pop. After you collect all the bottles and open the safe in episode 3, the item given to you will make all remaining bottles appear on your map/mini-map.
For a map of all the bottles:
Old West Bottle Locations Map

Bigfoot for Real – Track down Sly’s long lost Cooper relative in Episode 3. (Bronze)
Story Related Cannot Be Missed. This trophy will unlock upon completion of the job “Unexpected Ties” in Episode 3.

Bearcicle – Complete all the jobs and beat the boss in Episode 3. (Bronze)
Story Related Cannot Be Missed. This will unlock upon beating the boss during the job “Operation Jurassic Thievery” at the end of Episode 3.

Savings Account – Unlock the Cooper Safe in Episode 3. (Bronze)
Once you collect all 30 bottles, open the safe and the trophy will pop. After you collect all the bottles and open the safe in Episode 3, the item given to you will make all remaining bottles appear on your map/mini-map.
For a map of all the bottles:
Gungathal Valley Bottle Locations Map

Boomstick – Introduce Sly to his long lost Cooper relative in Episode 4. (Bronze)
Story Related Cannot Be Missed. This will unlock upon completion of the job Juggling Act during act 4.

I Believe the Time is Now – Complete all the jobs and beat the boss in Episode 4. (Bronze)
Story Related Cannot Be Missed. This trophy will unlock upon beating the boss during the job “Operation Mousetrap” at the end of Episode 4.

Zenny, Gil, or Just Loot – Unlock the Cooper Safe in Episode 4. (Bronze)
Once you collect all 30 bottles, open the safe and the trophy will pop. After you collect all the bottles and open the safe in Episode 4, the item given to you will make all remaining bottles appear on your map/mini-map.
For a map of all the bottles:
Medieval England Bottle Locations Map

I Need A Mouse Trap – Meet up with an old adversary. (Bronze)
Story Related Cannot Be Missed. This will unlock upon completion of the job “Shell Shocked Heart”.

Keep Your Turban On – Make friends with Sly’s long lost Cooper relative in Episode 5. (Bronze)
Story Related Cannot Be Missed. This trophy will unlock upon completion of the job “Lost and Found” during Episode 5.

Homesick – Complete all the jobs and beat the boss in Episode 5. (Bronze)
Story Related Cannot Be Missed. This trophy will unlock upon beating the boss during the job “All Rolled!” up at the end of Episode 5.

Check Please – Unlock the Cooper Safe in Episode 5. (Bronze)
Once you collect all 30 bottles open the safe and the trophy will pop. After you collect all the bottles and open the safe in Episode 5, the item given to you will make all remaining bottles appear on your map/mini-map.
For a map of all the bottles:
Ancient Arabia Bottle Locations Map

Online Shopping – Make your first purchase on ThiefNet. (Bronze)
Simply buy any upgrade from thief net in the hideout in episode one and the trophy is yours. The first upgrades that are available to buy are the Paraglider for $100, Elbo El Drop’o Combo for $200 and Sleep Ammo for $100. These will become available as soon as you enter the hideout in Episode 1, buy any one and the trophy will pop.

Sparrow Approves – Use the compass many times to navigate. (Bronze)
This should come naturally as you progress if for some reason you don’t have this trophy unlocked by the end of the game, replay any mission and keep hitting L3, tap the rear touchpad on the PS Vita to have the compass point you in the right direction and it should pop in no time. You must hit the compass 500 times to unlock the trophy.

Wardrobe Malfunction – Unlock your first change of clothing. (Bronze)
Story Related Cannot Be Missed. You will unlock this trophy during the job Breakout! in Episode 1, it will pop after obtaining the third part of the costume.

Costume Party – Obtain every costume in the game. (Silver)
Story Related Cannot Be Missed. This will unlock upon receiving the costume in Episode 5 during the job “Open Sesame”.

Cooper Calling Card – Collect your first hidden Sly mask. (Bronze)
The earliest you can get this is during the prologue. After the cutscene with the pipe that breaks you will be on a balcony, walk along the ledge and up the two pipes to reach the roof. Instead of climbing the pipe to the right, climb over the boxes in front of you and onto the roof, the first mask will be on the ground in front of you. Be careful of the spotlight.

Oh Look it’s Shiny – Pickpocket 10 unique items. (Bronze)
The earliest you can get this is in Episode 3. Each episode, including the prologue has three different items you can pickpocket, meaning the first item you pickpocket in Episode 3 should unlock the trophy. Refer to the Hassan Would be Proud trophy for more info.

Child of the 80’s – Beat the top high score of one hideout arcade. (Bronze)
To unlock the arcade machine in an episode you must first collect all the treasures in that episode, then simply beat the high score of the unlocked machine for this trophy. See the 8-Bit Bentley Style trophy for strategies for each arcade machine.

What’s Behind Door Number One? – Unlock a costume gate in any episode. (Bronze)
This can be done by opening any of the speciality doors with the costumes you receive in each episode. The earliest you can get this is in Episode 1. After receiving the samurai costume climb along the cliff until you reach the door that shoots fire at you, the cliff is on the western part of the map in the middle. Switch to the costume and shoot the fire ball back at the door by hold square and releasing when the fireball gets close. The trophy will pop as soon as the door opens.

Arcade Operator – Repair any arcade machine. (Bronze)
To unlock this trophy you first need to collect all the treasures in an episode, which will then automatically repair the arcade machine at the hideout of that episode. The earliest you can get this trophy is after receiving the fifth costume in Episode 5. You will need each costume to open all the doors to get the treasures, then collect all of the treasures in any episode and the trophy will pop.

Clockwerk Collector – Collect over 20 treasures. (Bronze)
If you’re collecting the treasures in order, as in the videos, then you will unlock this trophy in Episode 2. If not then simply collect any 20 treasures and the trophy will pop. See Quarter Cruncher for the locations of each treasure.

Apollo Wins – Have the perfect workout during the Training Montage. (Bronze)
This takes place during the job Getting Stronger in Episode 3. Simply do not miss any of the penguins or targets in the final minigames, the trophy will pop after the job is complete. If you happen to miss one, just reload the checkpoint. Most of the minigames are easy and you shouldn’t have too much trouble with them.

Get to the Chopper – Don’t take any damage during Up In Smoke. (Bronze)
This takes place during the job Up In Smoke in episode 5. When you get in Bentley’s RC chopper do not get hit by any of the missiles, if one gets close to you boost away using L1 and you shouldn’t have too much of a problem. If you get hit just reload the checkpoint and try again.

The Cooper Open – Have a 20 hit rally with Bentley in each hideout. (Bronze)
This is fairly simple to obtain, in each hideout there is a ping pong table, simply hit the ball back and forth 10 times. Both you and Bentley have to hit the ball 10 times without it falling off the table for this to count. Complete this in each hideout and the trophy is yours. The ping pong tables are automatically unlocked at the start of each episode. When in the hideout hit right or left until you get to the arcade machine, then hit the right directional arrow and you will be able to play ping pong.

Cheers – Don’t miss a single glass of sarsaparilla in Saloon Bug. (Bronze)
This takes place during Episode 2 during the mission Saloon Bug, as Bentley there will be a minigame where you have to slide sarsaparilla mugs to “customers”, simply complete all 30 without missing one and the trophy is yours. Beware though, about halfway through the game some “customers” require 2 or 3. If you happen to miss one then reload the checkpoint and try again.

Navigate Like Drake – Take a look at every map in every episode. (Bronze)
Open your map every time you come to a new area and you shouldn’t have a problem with this. These are the locations thought to be needed at this moment. If for some reason you missed one and have to replay a mission, you do not need to finish the mission for the map to count.
Paris:
Cooper Gang Hideout – This is not an episode-specific map and is always available via time travelling to Paris.
Museum Heist – This map is only available in the first section of the job “I Smell A Rat” in Paris.
Museum Heist – This map is only available in the second section of the job “I Smell A Rat” in Paris.
Le Blimp – This map is only available in the job “Deja Vu All Over Again!” in Paris.
Feudal Japan:
The Hidden Shuriken – This is not an episode-specific map and is always available in the hub world of Japan.
Feudal Japan – 1603 A.D. – This is not an episode-specific map and is always available in the hub world of Japan.
Imperial Prison – This map is only available in the job “Breakout!” in Japan.
Rioichi’s Sushi House – This map is only available in the job “Sushi House Startup” in Japan.
Sashimi Caverns – This map is available in the job “Something’s Fishy” in Japan.
Madame Geisha House – This map is only available in the job “Pretty in Pinker” in Japan.
Sashimi Caverns – This map is only available during the job “Spiked Sushi” in Japan.
Emporer’s Palace – This map is only available in the first section of the El Jefe boss encounter during the job “Altitude Sickness”.
Face to Face – This map is only available in the second section of the El Jefe boss encounter during the job “Altitude Sickness”.
Old West:
Hootenanny Clock Tower – This is not an episode-specific map and is always available in the hub world of the Old West.
Cotton Mouth Bluff – 1884 A.D. – This is not an episode-specfic map and is always available in
the hub world of the Old West as well as during the race in the job “Grand Key Larceny”.
Saddle Sore Correctional Facility – This map is available in the job “Jailhouse Blues” in the Old West.
Budd Stagg Caverns – This map is only available in the job “Cooper for Hire” in the Old West.
Bar Dynamite – This map is only available in the job “Saloon Bug” in the Old West.
Saddle Sore Correctional Facility – This map is only available in the job “Jail Break” in the Old West.
Cackling Jackalope Canyon – This map is only available in the job “Blind Date” in the Old West.
Gold Digger Express – This map is only available in the job “Operation: Gold Digger” in the Old West.
Ice Age:
Iced Campsite – This is not an episode-specific map and is always available in the hub world of Ice Age.
Gungathal Valley – 10,000 B.C. – This is not an episode-specific map and is always available in the hub world of Ice Age.
Lair of the Bear – This map is only available in the job “Unexpected Ties” in Ice Age.
The Murray Games – This map is only available in the job “Getting Stronger” in Ice Age.
Frostbite Peak – This map is only available in the job “Going Up” in Ice Age.
Cold Storage Caverns – This map is only available in the job “Ice Ice Bentley” in Ice Age.
Purple Paw Paint Factory – This map is only available in the first section of the job “Operation: Jurassic Thievery”.
Purple Paw Paint Factory – This map is only available in the second section of the job “Operation: Jurassic Thievery”.
Medieval England:
The Major Oak – This is not an episode-specific map and is always available in the hub world of England.
Medieval England – 1301 – This is not an episode-specific map and is always available in the hub world of England.
The Amazing Cooperoni – This map is only available in the job “Juggling Act” in England.
Belly of the Beast – This map is only available in the first section of the job “Mechanical Menace” in England.
Stirring Up Trouble – This map is only available in the job “Short Supply” in England.
A Total Fabrication – This map is only available in the job “Short Supply” in Egland.
Into the Fire (Lower) – This map is only available in the job “Short Supply” in England.
Into the Fire (Upper) – This map is only available in the job “Short Supply” in England.
Assembly Line – This map is only available in the job “Shell Shocked Heart” in England.
Mousetrap – This map is only available in the job “Operation: Mousetrap”.
Ancient Arabia:
Sneaky Snake Hideout – This is not an episode-specific map and is always available in the hub world of Arabia.
Ancient Arabia – 1001 A.D. – This is not an episode-specific map and is always available in the hub world of Arabia.
Lazy Trunk Spa & Lounge (Secret Area) – This is not an episode-specific map and is always available in the hub world of Arabia.
This location is in the northern part of the map by the palace, it’s to the right of the bridge and above the river. You will need to crawl in there to get there.
Honest Hassan’s Carpets (Store) – This map is only available in the job “Rug Rats”.
Honest Hassan’s Carpet (Underground Cavern) – This map is only available in the job “Rug Rats”.
Honest Hassan’s Carpets (Tower) – This map is only available in the job “Rug Rats”.
In A Jiffy Yellow Cab (Smuggler’s Cove) – This map is only available in the job “Copy Cats” in Arabia.
Crabby Guy Paperbacks – This map is only available in the job “Heavy Metal Meltdown” in Arabia.
Wise Monkey Lamps – This map is available in the jobs “All Rolled Up!” and “Lost and Found” in Arabia.
Here is a video showing the location of the Lazy Trunk Spa and Lounge:

Hubba Hubba – Don’t miss a beat in the Carmelita dance game. (Bronze)
This takes place during the job All Rolled Up! of Episode 5 at the very beginning, don’t miss a single beat and the trophy is yours. It may take you a few tries to learn the beats but once you do its pretty easy. If you miss a beat reload the checkpoint and try again.

Lunch Money – Slam 100 enemies with Murray. (Bronze)
You will most likely get this trophy naturally playing through the game. To slam enemies with Murray simply press and then to slam them into the ground. Two good places to farm this are during the boxing minigame in Episode 2 and the Tavern in Episode 4, as long as you don’t throw the enemies into the machines there will be an infinite number of enemies that spawn.

Unexpected Package – Place 60 bombs in enemy pockets with Bentley. (Bronze)
You can obtain this trophy fairly easily after obtaining the sleep bomb upgrade for Bentley. Simply place one on the enemy and detonate it to get him to fall asleep then place a bomb on his pocket and keep blowing them up over and over again and you will get it in no time. There is an upgrade later on in the game that lets you place 5 bombs at once. It’s kinda picky about the location of the bomb, you need to place the bomb exactly on the enemies pocket for it to count. Walk up behind the enemy and hold Triangle for a few seconds for this to work.

Waddle Waddle – Shoot 40 penguins with Carmelita. (Bronze)
When you are given the opportunity to choose Carmelita during episode 3, do so and shoot all the penguins you find. Do this 40 times and the trophy is yours. Once you shoot all the ones on the map the penguins do not respawn, simply restart the checkpoint and shoot more penguins. There are 10 penguins every time you leave the hideout.

Airborne – Paraglide for at least 10 seconds without using any geysers! (Bronze)
This is another very easy trophy to obtain. There are a number of places you can obtain this. The nest in Episode 3 and the really tall towers in Episode 5 are the best choices. Simply climb to the top and paraglide for more than 10 seconds and the trophy is yours. This can also be done in episode one as soon as you buy the paraglider.

Ancient Warfare 3 – Crackshot 10 enemies within 65 seconds. (Bronze)
After retrieving Tennessee’s cane and gaining the crackshot ability run around and crackshot as many people as you can. Try to get more than one in each crackshot to be sure you get all 10 in time.

Crazed Climber – Scale the dragon lair in under 90 seconds. (Bronze)
This takes place during the job Mechanical Menace in Episode 4, simply climb the tower in 90 seconds or less and the trophy is yours. You should get it after two or three tries.
![]()
Golden Arrows – Complete the archery minigame without hitting any friendly targets. (Bronze)
Another easy minigame challenge, this takes place during the job Hard Target in Episode 4. Simply reach the goal without hitting any of the friendly targets. Try not to rush through the challenge and you should be able to get this on your first try with plenty of time left. If you make a mistake simply reload the checkpoint and try again.

Downgrade – Complete any Alter Ego without leveling up once. (Bronze)
The earliest you can obtain this trophy is during the job “Something Fishy” in Episode 1, when you start the job you will be in front of a blue door that Bentley will hack. Simply complete the level without collecting five of the yellow ionic bits or one of the big red ones and the trophy is yours. If you accidentally level up you can restart the checkpoint and the trophy will still pop.

Radical Ninja – Stealth kill 15 enemies without alerting anyone. (Bronze)
This is a very easy trophy to obtain and you will likely get this very early on in Episode 1. You will obtain the stealth kill upgrade automatically during the prologue. Once you get to Episode 1 simply find 15 enemies and stealth kill them and the trophy is yours.

PayDay – Purchase every item in ThiefNet. (Silver)
This should come naturally as you progress through the game, after each mission you complete there will be more upgrades to buy. There are a total 59 upgrades to buy for a total of 32,500 coins. You should have plenty of coins as you play by breaking objects, killing/looting enemies and collecting treasures but if you need more you can farm enemies for loot for a few minutes then you should have plenty.

Hero Tech – Battle with a secret weapon. (Bronze)
To obtain this trophy you first must collect at least 50 masks then press START => Extras => Unlockables and turn the secret weapon on. You can unlock this trophy with the secret weapon you get from collecting 50 masks or 60 masks. Once you do choose Sly and hit any enemy and the trophy will pop.

Cloud City – Defeat El Jefe on each tower without losing any health. (Silver)
Even though this trophy says to not take damage from El Jefe, you actually can’t take any type of damage during the fight. This means you don’t just reload the checkpoint if you take damage from El Jefe during platform fights, you also have to reload the checkpoint if you take damage from falling or getting hit by one of El Jefes fireball attacks while going to each platform. Play through the fight this way and the “Cloud City” trophy should pop.

Hassan Would Be Proud – Pickpocket a full collection of every item in the game. (Silver)
In each episode, including the prologue, there are three items you can pickpocket. Simply pickpocket each item with sly and the trophy is yours. For the prologue when in control of Bentley you will drop down a hole that triggers a cut scene, follow the tunnel around and there will be two rat guards to pickpocket. If they don’t have any or you get ones you already have then reload the checkpoint and try again. The pickpocket items can be gotten with any character except Carmelita, not only with Sly, as seen by using Bentley in the Prologue.
On a side note, the Prologue items do not have to be gotten in the prologue, you can pickpocket them off of any of the rat guards throughout the game, however, the prologue is the earliest you can get them if you wish to get them out of the way early. You can also get them by buying the Looty Shake upgrade and shaking the treasures out of the rats with Murray during the job Short Supply in Episode 4.
Pickpocket Items & Values
Prologue:
1) Swiss Cheese – $100
2) Gas Grenade – $200
3) Tomato Juice Box – $500
Feudal Japan:
1) Kabuki Mask – $100
2) Mahjong Tile – $200
3) Ivory Chopsticks – $500
Old West:
1) Gold Nugget – $100
2) Deputy Badge – $200
3) Sliver Belt Buckle – $500
Ice Age:
1) Lava Rock Spearhead – $100
2) Amber Fossil – $200
3) Tribal Penguin Mask – $500
Medieval England:
1) Pocket Watch – $100
2) Platinum Gear – $200
3) Emerald Dragon Eye – $500
Ancient Arabia:
1) Pearl Earring – $100
2) Scorpion Tail – $200
3) Red Ruby Ring – $500

Quarter Cruncher – Unlock all 6 arcade machines. (Silver)
This will unlock after you’ve collected every treasure in the game.
Feudal Japan Treasures:
For a map of the Treasure Locations:
Feudal Japan Treasure Locations Map
Old West Treasures:
For a map of the Treasure Locations:
Old West Treasure Locations Map
Gungathal Valley Treasures:
For a map of the Treasure Locations:
Gungathal Valley Treasure Locations Map
Medieval England Treasures:
For a map of the Treasure Locations:
Medieval England Treasure Locations Map
Ancient Arabia Treasures:
For a map of the Treasure Locations:
Ancient Arabia Treasure Locations Map

Mark Your Territory – Collect all the hidden Sly masks. (Gold)
Here are all the Mask locations for the Prologue through the Epilogue.
Mask Locations
Prologue Paris:
1) After the cutscene with the pipe that breaks you will be on a balcony, walk along the ledge and up the two pipes to reach the roof. Instead of climbing the pipe to the right, climb over the boxes in front of you and onto the roof, the first mask will be on the ground in front of you.
2) After learning how to aim bombs with Bentley, jump over the gaps reach the end of the tunnel then make a left and the mask will be to the left by some bars.
Feudal Japan:
Here is a video of all the mask locations in Episode 1:
For a map of the all the Mask Locations:
Feudal Japan Mask Locations Map
1) At the north most part of the map you need Rioichi to Jump across, behind some boxes.
2) At the middle/western most part of the map, it’s behind a gold rhino. You need Rioichi to obtain this.
3) During the Breakout job after entering the prison, head down the stairs and it will be in the jail cell to the left. To access it follow the level around to the left, after the cutscene where you first meet Rioichi head immediately left after the two guards and crawl through the hole in the wall.
4) During the Breakout Job after completing the first section where you find out the samurai costume is fire proof head back out along the piers, after entering the archway it will be right in front of you in another jail cell. This is the second fire section. To access it follow the level around to the back of the jail cell, jump to the ledge and crawl on through.
5) During the Sushi House Start up Job immediately after entering the Sushi House as Rioichi, climb up the plant in front of you and jump onto the lantern in front of you. Focus jump to the right and the mask will be in front of you on your right.
6) During the Sushi House Start up Job at the end of the mission right before pulling the lever, climb up the pipe to your left and then jump to the left for the mask.
7) During Pretty in Pinker after entering the Geisha House you will have to focus jump a few times over a little pond, at the end there will be some rat guards, climb the plant to the top ledge and focus jump across to the end, the mask is behind the boxes.
8) During the Something’s Fishy Job right after you enter Sashimi Caverns it’s directly behind you.
9) During Altitude Sickness immediately after entering the Emperor’s Palace turn around and look to your left.
10) During Altitude Sickness after the cut scene where El Jefe steals Rioichi’s cane cross the bridge and the mask will be on your left after the doors open for you.
11) In the arcade machine there is a “secret” portal and when you hit it, it will take you to a different level where the mask will be.
Old West:
Here is a video of all the mask locations in Episode 2:
For a map of the Mask Locations:
Old West Mask Locations Map
1) From the hideout follow the tracks to the right for a little ways until you come to an opening in the canyon walls on your left, the mask is behind the little bouncy awning.
2)During the job Jailhouse Blues after the cutscene where Kid Cooper talks about hearing voices in his head telling him to blow things up, change out of the prisoner costume, go left and destroy the shack just to the right of the TNT barrel, it’s in the little house.
3) During the Jailhouse Blues job Right after Bentley tells you about the archway being a locking mechanism, go to your left and the mask is behind some barrels.
4)In the main world ride the train around past the little alcove where you shoot the scorpions there will be a platform to your right you can jump onto. The mask is on the roof next to a bottle.
5) During the job Cooper for hire after the first rail slide sequence there will be a bridge above you that a guard is walking on, the mask is on the bridge to the left.
6) During the job Cooper for Hire after getting Kid’s gun, before using crackshot to open the third door, use crackshot to break the boxes to the right of the platform. The mask is inside.
7) During the job Jailbreak, where you’re on the river with Carmelita and Tennessee, after opening the second door for Carmelita climb down the rope in front of you and jump to the rock.
8) During the job Saloon Bug, upon entering the casino with Sly its on top on the stage coach in the middle of the room.
9) During the job Operation: Gold Digger, after turning the lasers off with Tennessee its behind you.
10) In the same job after turning the lasers off for the second time its behind you.
11) in the arcade mission after getting the purple tank its on the second level. You will need to blow up a wall on the right side to access it.
Gungathal Valley:
Here is the video of all the mask locations in Episode 3:
For a map of the Mask Locations:
Gungathal Valley Mask Locations Map
1) During the job Unexpected Ties, the mask will be behind the bed after collecting the sabertooth costume.
2) During the job Going Up when the eggs start falling at you when you get to the top of the wall go right instead of left and the mask will be hanging on the wall.
3) During the job Ice Ice Bentley the mask will be at the end of the second tunnel, where the eggs are coming at you, on the right. You will need to place a bomb on the breakable wall to access it.
4) During the job Operation: Jurassic Thievery after gaining control of Bob and breaking the second valve drop all the way to the bottom and it will be on a ledge behind some boxes.
5) During the job Operation: Jurassic Thievery after gaining control of Sly you will have to paraglide over some geysers, the mask will be just after the fifth geyser on your left on a ledge behind some boxes.
6) As Sly head to the bottom right corner of the map, behind a tree there will be a little plant you can climb up, do so and then jump onto the platform. There will be a ledge to the left off the map that you can paraglide to. The mask is on the ledge.
7) In the bottom middle of the map there is a river with ice blocks floating on it that you can ride on, the mask is underneath the left bridge, just jump on an ice block to grab it.
8) As Bob head down the ice river, to the left bridge and cross it, going north, there will be an ice wall you can climb, the mask will be on the far left of the wall.
9) As Bob head to the bottom left corner of the map, towards where Grizz’s palace is. When facing the door with the bear claw on it, head to the right of the stick bridge and there will be an ice wall to your right that you can climb. The mask is at the top.
10) Climb on top of the hideout with sly and it will be in a nest in front of you as you climb up.
11) In the arcade machine Spark Runner it will be at the very beginning of the level at the first corner. It may not be there at first so try hitting a few bumpers at the start and it should show up.
Medieval England:
Here is a video of all the mask locations in Episode 4:
For a map of the Mask Locations:
Medieval England Mask Locations Map
1) During the job the Juggling Act before swinging across to the next platform for the first time, break the barrels on the platform, then switch to the archer costume and shoot the arrow across, the mask is on the platform.
2) During the job Juggling Act after getting on the second rope you can climb up or down on it is all the way at the top on a platform.
3) During the job Mechanical Monster after going down the tunnel and arriving at the base of the tower, the mask will be on a little ledge to the right and below you.
4) During the job Shell Shocked Heart, after gaining control of Bentley in the blacksmith’s when arriving at the first gear there will be some wooden planks you can place a bomb on, the mask is behind the planks.
5) During the job Shell Shocked Heart after the second hack instead of heading towards the lasers, jump across the gears to the left and throw a bomb on the box at the end and the mask will be on the ledge.
6) In the main world it is on top of the Tavern building on the roof directly in front of the beer mug.
7) In the main world head to the bottom middle map tower the mask is on the top platform. Sir Galleth is needed to get this.
8) In the main world on the north middle part of the map, before going into the castle there is a tall building to the right of the entrance to the castle, the mask is at the top. Sir Galleth is needed to get this.
9) In the main world in the bottom right corner of the map, next to the ship, there is a tower, the mask is on the second level of the tower. Sir Galleth is needed to get this.
10) After leaving the hideout, there is a tower to your left, the mask is on a platform halfway up the tower.
11) In the arcade machine after going through the first portal you will be transported to another alter ego level, stick to the bottom of this level and there will be a portal you can go through that will take you to the mask.
Ancient Arabia:
Here is a video of all the mask locations in Episode 5:
For a map of all the Mask Locations:
Ancient Arabia Mask Locations Map
1) During the job Rug Rats while climbing up the tower, you will come to a point where you have to walk along a ledge while avoiding the lights of the guards. Inside this room are three guards, the mask is on a table at the back of the room.
2) During the job Copy Cats, upon entering the sunken ship head to the right and the mask will be on a platform in the corner.
3) During the job Heavy Metal Meltdown when you enter the book shop head to the right and climb up the chain. Climb up the pink rope across the room, at the top jump to the two platforms on the right, the mask is on the second one.
4) During the job All Rolled Up! While fighting Miss Decibel. After she runs away from you for the second time, cut the chain and head to the next platform. The mask will be in front of you and below the platform, it’s on a little ledge you can spire jump to.
5) In the middle of the map there is an incredibly tall tower that you can only climb by using Salim or the thief costume, the mask is at the top.
6) In the middle of the map there is a giant archway with what looks like a gorilla wearing a turban, the mask is at the top of the archway.
7) Upon leaving the hideout there will be an island directly in front of you, head to the left to use the archer costume to get over there, the mask is behind the tower.
8) After leaving the hideout head to the right and follow the beach until you spire jump on a ledge and circle around a pillar, in front of you will be a blue/greenish roofed building. The mask is on top of the building on one of the little pillars.
9) In the northern part of the map there is a river running across with a magic carpet that flies above it, the mask is underneath the bridge on a sword you can spire jump too.
10) In the Lazy Trunk Spa and Lounge on top of the bed to the left as you enter. From mask number 9 if you jump back to the rocks in the water and climb up the purple rope, the entrance to the spa will be a crawl space right in front of you.
11) In the arcade machine when you start you will first be given the green tank to use, complete the three areas by going into each portal and you will be given the pink/purple tank to use. Play until the third area, as soon as you spawn in their will be a wall directly to your left that you can shoot and blow up. The mask is in there.
Epilogue:
Here is the video of all the mask locations for the Epilogue:
1) After gaining control of Rioichi for the second time, head to the right and you’ll see a giant hole in the ground. The mask will be on the right on a little ledge that you need to jump to, behind some boxes.
2) When gaining control of Tennessee head up and around to the second level of the first room, before heading through the door at the end, head to the right then jump to the platform and It will be behind some boxes.
3) In the arcade machine after completing the alter ego level, you will be transported to a spark runner level; the mask will be at the very end of the level in the top left of the screen, on the same platform as the finish.

8-Bit Bentley Style – Beat every hideout arcade’s top high score. (Gold)
For the two alter ego arcade games, flying in a jetpack, try to get to level 10 as fast as possible and stay there. Whilst on level 10 destroy every enemy you can and collect every ionic bit you can get to, both the blue and yellow ones. Also try to hit the secret portals that are within the levels. They give you free points and a sly mask, and when completed you restart the level you were on for even more points. If you get to the CPU and do not have enough points simply wait behind some blocks where you cannot get shot, then continuously shoot the blue blobs that are released. It may take some time but this will definitely get the job done.
During the Spark Runner arcade game in Episode 3, to easily beat the high score, right as the game starts, collect the purple timer power-ups around the middle bumper, then go downwards below that bumper and squeeze yourself between the two bumpers here. Keep hitting the bumpers on each side for as long as you can (until you have about five seconds left on your timer and around 700-800 points) and then quickly gather the timer power-ups on the left side and keep going on until you get a score higher than 1,000.
For the two tank ones simply destroy everything you see, if you’re running low on health know that switching to another color tank will give you full health so you can kill enemies with that tank and then switch back when needed.
The Paris arcade machine will be a mix, starting with alter ego and then spark runner. The same strategies as before apply and you should get this before finishing marble madness. In the arcade machine in Paris if you restart checkpoint when you’re about to die or run out of time, you will restart at the beginning and you will keep all your points.
Beat all 6 arcade machines high scores and the trophy will unlock.

Final Chapter? – Complete every job and beat every boss in all the episodes. (Gold)
Story Related Cannot Be Missed. This will unlock after beating the final boss.
Here you go guys our Sly Cooper: Thieves in Time Trophy Guide. This was the first guide I, HTG Doug, had ever written back before I even worked for HappyThumbsGaming and we decided to bring it over to our website for all of you to enjoy/use/benefit from. If you have any questions or comments about this guide, the game in general, or anything in general, feel free to ask them on Facebook, Twitter, Google+, Youtube, in the comments below and we will do our best to get back to you as soon as possible. While you’re on the above pages be sure to like us, follow us, and subscribe to us to stay up to date on the latest news and information that we have for you guys. We hope you find the guide useful and are enjoying the game!!!