Lego Jurassic World Trophy/Achievement Guide – HTG


Thumby’s Essential Information
Platinum/100% Difficulty: 1/5
Estimated Time to Platinum/100%: 20-25 hours
Step 1: Complete the game in Story Mode while collecting as many Amber Bricks and Minikits as possible and interacting with the Information Kiosks
There are 20 levels that you must complete in story mode. You have the option to play either Jurassic Park or Jurassic World first so feel free to pick either, there is no real benefit to picking one over the other. Doing Jurassic World first will give you access to the x2 red brick slightly earlier but you will have plenty of studs anyway so it doesn’t particularly matter which you choose. You will more than likely have enough to buy the x4 by the end of the story so you may choose to just buy that one first but again not 100% necessary as everything in this game is pretty cheap. For the Red Brick locations please refer to the One Big Pile of Bricks Trophy/Achievement description. Make sure that as you are playing the chase sequence during the credits that play at the end of each movie as you can get 150,000+ studs, without multipliers, just by playing through them. I personally skipped one and still ended up with over 2,000,000 studs by the end of story mode without using any Red Bricks. While going through the story be sure to pick up the Amber Bricks in Park Shutdown and InGen Arrival as the dinosaurs from those two Amber Bricks are needed for Free Play. For their locations please refer to the collectible guide found at the bottom of the page. As you are going through the story you should also be using all the information kiosks that you can find as when you use them all the collectibles pop up on your map and they become a fast travel point. See the collectible guide at the bottom of the page for their locations.
Step 2: Prepare for Free Play
After you have completed the story if you haven’t yet bought the x2 or x4 red brick then I suggest you go ahead and do that now. Next there are two dinosaurs that you will want to make sure you have unlocked before you start Free Play. The first is the Dilophosaurus which is found in the Park Shutdown Story/Free Play mission by picking up the Amber Brick and the Compy dinosaur which is located in InGen Arrival by picking up the Amber Brick. Both of those Amber Bricks are Attainable in Story Mode so it is possible that you already have them. Once you have a multiplier red brick and the two dinosaurs you can start Free Play.
Step 3: Complete the 6 Bonus Chase Levels
There are 6 Bonus Chase levels that you can play that will unlock as you complete the movies in Story Mode. All 6 are very straightforward and are pretty much the same as the chases that take place during the credits. At this point you should have already bought at least one Red Brick Multiplier but by the time you do all 6 of these with a multiplier active, you should have enough to buy another one or maybe even two. See the One Big Pile of Bricks Trophy/Achievement description for all the Red Brick Locations.
Step 4: Complete all 20 levels in Free Play while collecting all remaining Amber Bricks and Minikits
Once you are fully prepared for Free Play you can start going through the levels in Free Play picking up any remaining collectibles. Note that once you have collected all the minikits and amber bricks you can simply save and quit the level and everything will be saved. You will also want to be sure you achieve True Survivor in every level if you haven’t already done that. While going through Free Play you will also want to go for the Not Machine Compatible Trophy/Achievemnt for trying to use a hacking terminal as Alan Grant so you won’t have to replay the level again later. During your Free Play run you can also purchase Dennis Nedry for 100,000 studs and throw his soda can at a human enemy to unlock Anybody Want a Soda? Trophy/Achievement and eliminate a little more backtracking, InGen Arrival is a good level for this.
Step 5: Free Roam Collectibles
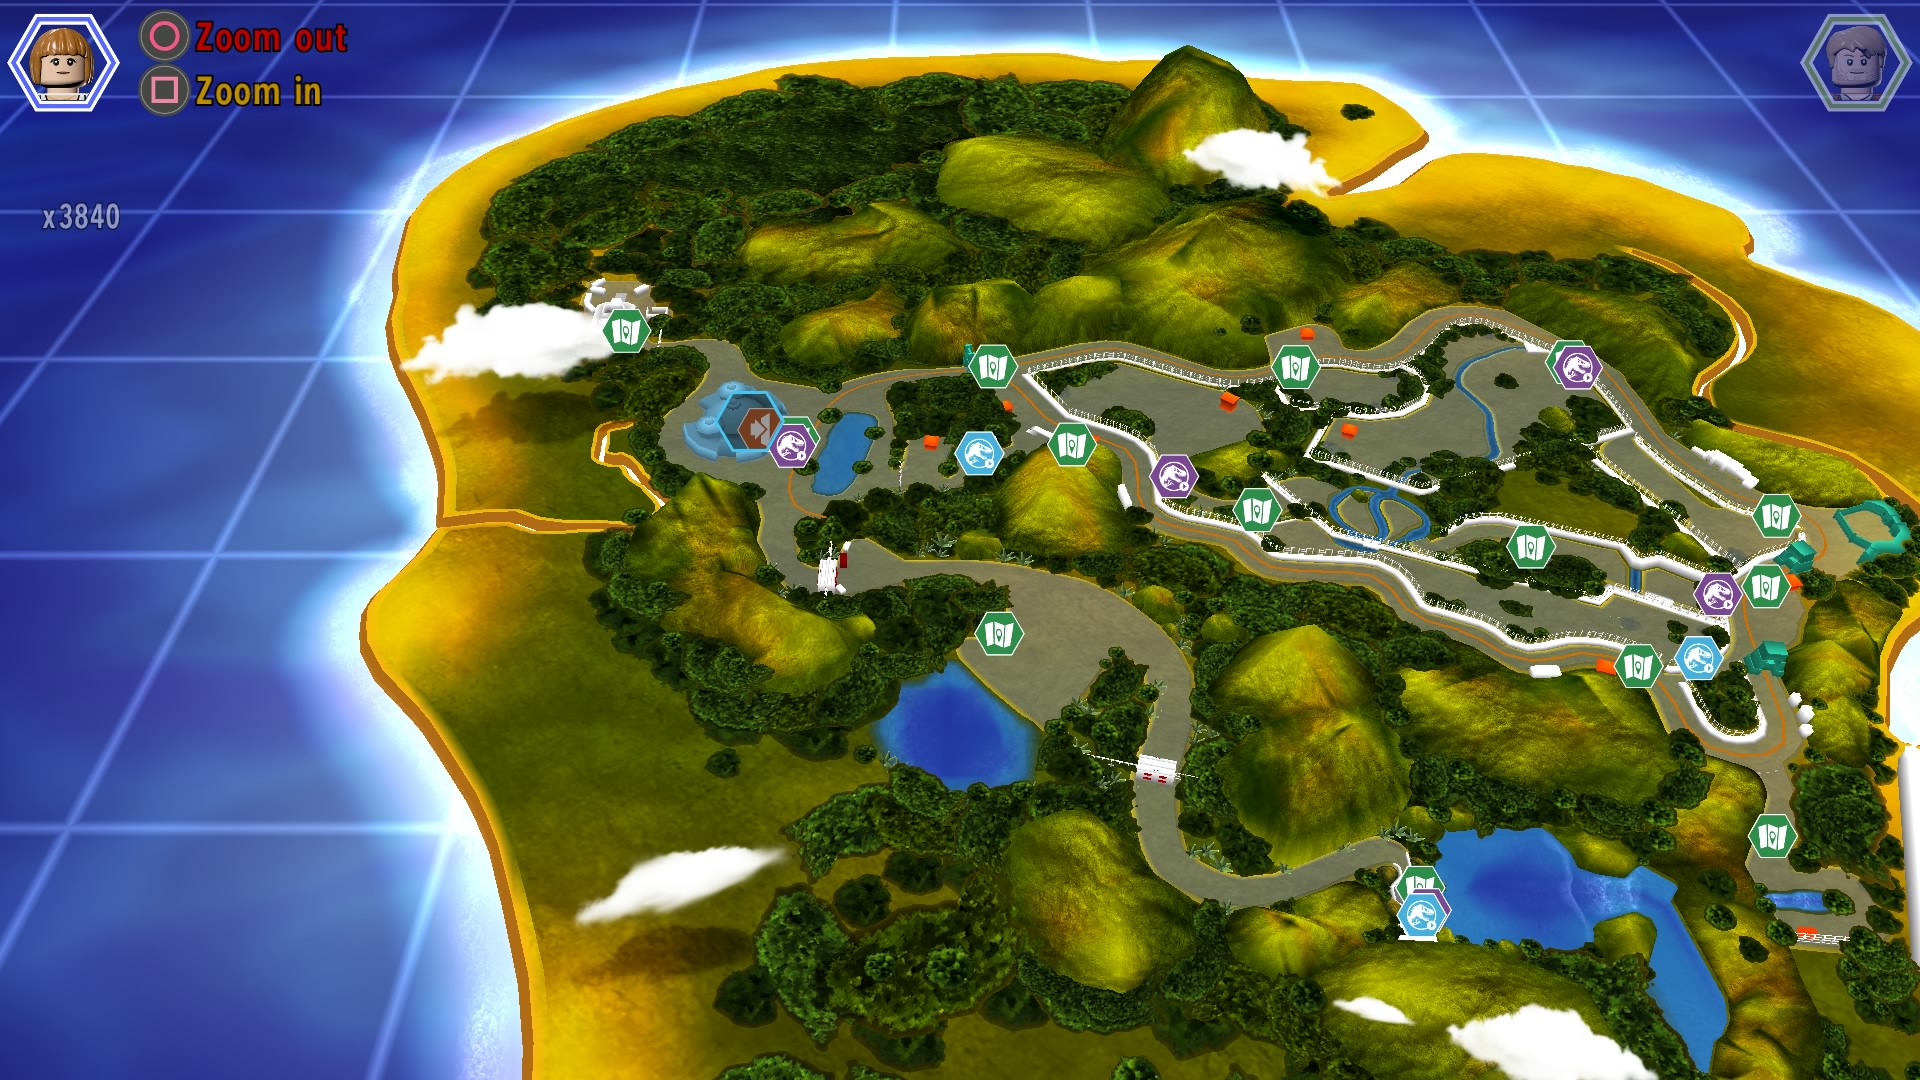
Now is the time for the dreaded Free Roam Collectibles, luckily most of these are incredibly easy to do and shouldn’t give you too much trouble, including the races (even the flying ones!!!). There are 20 red bricks, 20 races, 20 photograph points, 10 dinosaurs to heal, 20 workers in peril to rescue, and a large number of gold bricks to collect. These are made super easy to collect due to the fact that you can interact with information kiosks scattered around the parks that when used make all the collectibles in the area pop up on your map. If you were picking these up as you went by them in story mode you should have most of them but chances are you will still be missing a few. The breakdown of information kiosks per island is as follows:
– Jurassic Park Island: 14 kiosks
– Jurassic Park Lost World: 6 Kiosks
– Jurassic Park 3: 7 Kiosks
– Jurassic World: 9 kiosks
For help on how to collect them all please refer to the collectible guide at the bottom of the page.
Step 6: Cleanup/Miscellaneous Trophies
In this step you should clean up anything you may not have done yet like The Human Piece of Toast Trophy/Achievement, Building Blocks of Life Trophy/Achievement, Hello John! Trophy/Achievement etc. etc. Upon the completion of all the Miscellaneous Trophies/Achievements and this step you should have your shiny new Platinum Trophy. Congratulations!!!
Glitch Notes/Warnings:
Throughout this game I have run into numerous glitches/issues, some bad/annoying, and some rather helpful. Here I will list all known glitches and how to fix/avoid them if possible and will update this as information is released.
– There is a glitch in the The Hunted Free Play level where sometimes the dinosaur that you take a picture of to save a human will not trigger as having left leaving the level unfinishable. Make sure you have a character that can take a photo before hitting the circle to have a better chance of avoiding this glitch.
– There is a glitch in the Gyrosphere Valley story level where sometimes the Gyrosphere will spawn under the map making it useless. Fortunately you can just continue on with the level using the other character and it will fix itself after you get to a later part.
– During story missions if you use the save terminals then save and quit out of a level, then return to finish the level later, the trophy for finishing that level will not unlock. To fix this issue simply replay the level in story mode in one sitting and the trophy should unlock. I recommend just not using the save terminals at any point in the game to avoid potential glitches.
– There is a display bug in the Free Roam where some icons for Gold Bricks and other icons may not appear on your map even though you have the kiosk activated for that area. There is no known fix at this time so just be sure to check every map point to make sure that you have everything and don’t go by the icons on the map.
– There is a glitch where after you have collected certain gold bricks, usually races, the gold brick detector will still show an arrow above the gold brick. This does not affect your overall total so you can just ignore it and continue on.
– There is also a glitch/issue in areas where characters when they get close to a dinosaur they will back up away from them, there is a slim chance that the character will get stuck on something next to them and just continuously walk backwards into whatever they are stuck on making that character useless. Anytime you are in one of these situations just be mindful of your surroundings so you don’t get stuck.
– There is a somewhat helpful glitch where minikits that are behind walls can be gotten just by switching to a dinosaur when you are right next to the wall. Since the dinosaurs are bigger and longer it seems that the game lets the characters go through the wall for a second and grab the minikit. This does nothing other than save you a few seconds of time.
– There also seems to be a glitch at the beginning of the Breeding Facility Story Mission where the cracked wall at the beginning of the level can simply be shot by a gun allowing you to get the minikit without having to use a dinosaur. This does nothing other than save you a couple seconds of time.
– There also seems to be a glitch where getting a certain amount of studs in the credits chase sequences will actually give you a true survivor and count towards your overall total. I believe this happens if you get to the chase sequence and have not gotten a single True Survivor yet but I am not sure. I am also unsure if this will cause any problems with your True Survivor count or unlocking the Trophy.
– There is also a glitch/issue that I ran into a few times where you cannot fast travel if you are not only a dinosaur but if there is a dinosaur in your party at all at the time you try to fast travel. To fix it just switch all characters off of a dinosaur and try again.
– There is also a somewhat annoying glitch where if you fast travel while you are in one of the dark caves that requires a light when you load in on the new area your character will still be walking like he/she is still in the cave. To fix it try switching to a new character (if possible) or try fast traveling again and it should fix itself.
LEGO Jurassic World Trophy/Achievement Guide

Life Finds a Way – Collect all of the Trophies (Platinum)
Once you have collected every other Trophy you will have a shiny new Platinum.

Welcome to Jurassic Park – Completed the Prologue (Bronze/20G)
Story Related Cannot Be Missed.

The Calm Before the Storm – Completed Welcome to Jurassic Park (Bronze/20G)
Story Related Cannot Be Missed.

Objects in the Mirror – Completed Park Shutdown (Bronze/20G)
Story Related Cannot Be Missed.

We’re Being Hunted – Completed Restoring Power (Bronze/20G)
Story Related Cannot Be Missed.

Decided Not to Endorse Your Park – Completed The Visitor Center (Bronze/20G)
Story Related Cannot Be Missed.

That’s How it all Starts… – Completed Isla Sorna (Bronze/20G)
Story Related Cannot Be Missed.

Mommy’s Very Angry – Completed InGen Arrival (Bronze/20G)
Story Related Cannot Be Missed.

Don’t Go Into the Long Grass – Completed The Hunted (Bronze/20G)
Story Related Cannot Be Missed.

What About the Others? – Completed Communications Center (Bronze/20G)
Story Related Cannot Be Missed.

Just Follow the Screams – Completed San Diego (Bronze/20G)
Story Related Cannot Be Missed.

Not On InGen’s List – Completed Landing Site (Bronze/20G)
Story Related Cannot Be Missed.

Nobody Move a Muscle – Completed The Spinosaurus (Bronze/20G)
Story Related Cannot Be Missed.

Is This How You Make Dinosaurs? – Completed Breeding Facility (Bronze/20G)
Story Related Cannot Be Missed.

Family Reunion – Completed Eric Kirby (Bronze/20G)
Story Related Cannot Be Missed.

Going Home – Completed The Bird Cage (Bronze/20G)
Story Related Cannot Be Missed.

The Park is Open – Completed Welcome to Jurassic World (Bronze/20G)
Story Related Cannot Be Missed.

Full Jurassic World Experience – Completed Gyrosphere Valley (Bronze/20G)
Story Related Cannot Be Missed.

Are You Following the Dinosaurs? – Completed Out of Bounds (Bronze/20G)
Story Related Cannot Be Missed.

A New Alpha – Completed Under Attack (Bronze/20G)
Story Related Cannot Be Missed.

We Need More Teeth – Completed Main Street Showdown (Bronze/20G)
Story Related Cannot Be Missed.

65 Million Bricks in the Making – Completed all Story Levels (Gold/40G)
Story Related Cannot Be Missed.

Something Has Survived – Obtained “True Survivor” in any level (Bronze/20G)
See Survival Expert Trophy/Achievement for more information.

We’re Out of a Job… – Collected all Minikits in any Level (Bronze/20G)
See the …Don’t You Mean Extinct Trophy/Achievement for more information.

…Don’t You Mean Extinct – Collected all the Minikits in the game (Silver/40G)
There are a total of 200 minikits that you must collect, 10 in each level, to unlock this trophy/achievement. Some are obtainable in Story Mode but most you will have to get on your Free Play playthroughs. For a full list of all minikit locations please refer to the collectible list at the bottom of the page.

Went And Made A New Dinosaur – Created a custom dinosaur (Bronze/20G)
There are two locations where you can create a dinosaur, one in the Jurassic Park Island area and one in the Jurassic World Island area. The one on Jurassic Park Island is located in the Visitor Center in the top left corner of the map. Once inside the building there will be a door in the left corner that you can enter that will lead you to the customizer. The Dinosaur Customizer in the Jurassic World island is located on Main Street in the Triangle looking tent on the map. Inside the building, head to the far left to the Hammond Creation Lab to find the customizer. Once you get to a customizer change anything about the dinosaur, color, head, etc. or just randomize it and the trophy/achievement will unlock.

All I Got Was This T-Shirt – Created a Custom Character (Bronze/20G)
You can create a custom character in the Jurassic World Island Park on Main Street. On the map it will be the orange triangle building, its also the building just to the left of the monorail. Once inside the building, on the first floor, head to the top right section to see a fitting room door. Enter the room and you will be able to modify a character, change anything about one, hat, hair, etc.., and the trophy/achievement will unlock when you’re done.

Spared No Expense – Collect 65,000,000 Studs (Silver/40G)
You must have 65,000,000 studs on you at one time to unlock this trophy/achievement, it is not overall. This is actually a lot easier than it sounds with the help of the x2, x4, x6, x8, and x10 red bricks. With a few of the multiplier bricks turned on you should get 65,000,000 in a level or two so no need to go out of your way. For the locations of the multiplier red bricks please refer to the One Big Pile of Bricks Trophy/Achievement. By the time you get close to the platinum trophy you should have way more than a billion studs.

Bingo! Dino DNA! – Collect an Amber Brick (Bronze/20G)
Amber Bricks are a collectible found during story/free play levels. There are a total of 20 amber bricks, 1 per level to collect. It is impossible to miss this trophy/achievement as the amber brick in second level, Welcome to Jurassic Park, is unmissable. For a full list of the amber brick locations please refer to the collectible list at the bottom of the page.

The Legacy of John Hammond – Collected all Amber Bricks (Silver/40G)
There are a total of 20 Amber Bricks for you to obtain throughout the Story/Free Play levels, one per level. For all the Amber Brick locations please refer to the collectible list at the bottom of the page.

Send The Helicopters – Rescued all Workers in Peril (Bronze/20G)
There are a total of 20 Workers in Peril for you to save throughout all 4 parks in Free Roam. They will be indicated by a Red Icon with a worker on it on your map. The easiest way to locate all of them is to interact with the information kiosks around each of the islands. Upon interacting with an information kiosk the locations of all collectibles in that area will appear on your map, making finding all 20 very easy. To save them you will have to do various things such as repair an object, cut a rope, open a container etc. Depending on how far in the story you are you may not have all the characters necessary so I recommend waiting until you have at least finished story mode, preferably after you have finished free play, before attempting to rescue them all. After you have saved all 20 the trophy/achievement will unlock.

What Lysine Contingency? – Healed all Dinosaurs (Silver/20G)
There are a total of 10 dinosaurs that you must heal throughout the four parks in Free Roam. They will be indicated by a Red Icon with a dinosaur on it on your map. The easiest way to locate all of them is to interact with the information kiosks around each of the islands. Upon interacting with an information kiosk the locations of all collectibles in that area will appear on your map, making finding all 10 very easy. Some dinosaurs will require you to have “activated” them first, usually by rummaging through a poop pile. You will know the dinosaur is activated when three items are circling above its head. Once you have “activated” it you will have to find the three items, they will all be located in the area of the dinosaur. For some of the items you will have to have certain characters/abilities so I recommend waiting until at least after you finish story mode, preferably Free Play, before trying to heal all 10. Once you have healed all 10 the trophy/achievement will unlock.

Must Go Faster – Completed All Races (Silver/20G)
There are a total of 20 races that you must complete throughout the four parks in Free Roam. They will be indicated by a white and black checkered flag Icon on your map. The easiest way to locate all of them is to interact with the information kiosks around each of the islands. Upon interacting with an information kiosk the locations of all collectibles in that area will appear on your map, making finding all 20 very easy. All 20 races are pretty easy to finish, even the flying and underwater one, by using a few simple tricks. Vehicles are the fastest way to complete a race but if there isn’t a vehicle station nearby, most races can be completed by using a dinosaur that has a charge ability, like the baby Triceratops or the Pachycephalosaurus. To charge with the dinosaur simply hold Square and you will run faster. The underwater race will require you to have the Mosasaurus unlocked before you can enter the water, you unlock it by collecting the Amber Brick in the Main Street Showdown Level. The flying race will require you to have either the Pteranodon or Dimorphodon dinosaurs unlocked to access it, the Pteranodon is unlocked by collecting the Amber Brick in the The Bird Cage level. Upon completion of all 20 the trophy/achievement will unlock.

Observe and Document – Completed all Photographs (Silver/20G)
There are a total of 20 Photograph points that you must complete throughout the 4 parks in Free Roam, the photograph points in the story/free play levels do NOT count towards this trophy/achievement. They will be indicated by a camera icon on your map. The easiest way to locate all of them is to interact with the information kiosks around each of the islands. Upon interacting with an information kiosk the locations of all collectibles in that area will appear on your map, making finding all 20 very easy. Once you arrive at a photograph point simply choose a character that can take photographs, Sarah Harding, Billy Brennan, or Gray Mitchell, and interact with the camera stand. Some of the points will require you to build the stand first by finding it nearby by using various abilities. Some of the abilities/characters you need might not be available yet so I recommend attempting to unlock all 20 after you have completed Story Mode, preferably Free Play, to eliminate some backtracking.

Next Time It’ll Be Flawless! – Achieved 100% Completion (Gold/70G)
To achieve 100% completion you basically need to do/collect everything in the game. The following is a list of everything needed to hit that 100% mark:
1) Complete Story Mode
2) Complete the 6 Bonus Chase Levels
3) Achieve True Survivor in Every Story/Free Play Level + each Bonus Level
4) Collect all 200 Minikits
5) Collect all 20 Amber Bricks
6) Complete all 20 Photograph points
7) Heal all 10 dinosaurs
8) Collect all 20 red bricks (purchase not necessary)
9) Rescue all 20 Workers in Peril
10) Complete all 20 races
11) Collect all 275 Gold Bricks
12) Purchase every character
13) Purchase every vehicle
The easiest way to find all the collectibles in Free Roam is by interacting with the information kiosks scattered around each of the HUB parks. The breakdown of information kiosks per island is as follows:
– Jurassic Park Island: 14 kiosks
– Jurassic Park Lost World: 6 Kiosks
– Jurassic Park 3: 7 Kiosks
– Jurassic World: 9 kiosks
Below are pictures of the Information Kiosks for each of the 4 islands, there are a few information kiosks that are behind the story icons so be sure to take note of those. Information Kiosks are the green icons with a map on them.
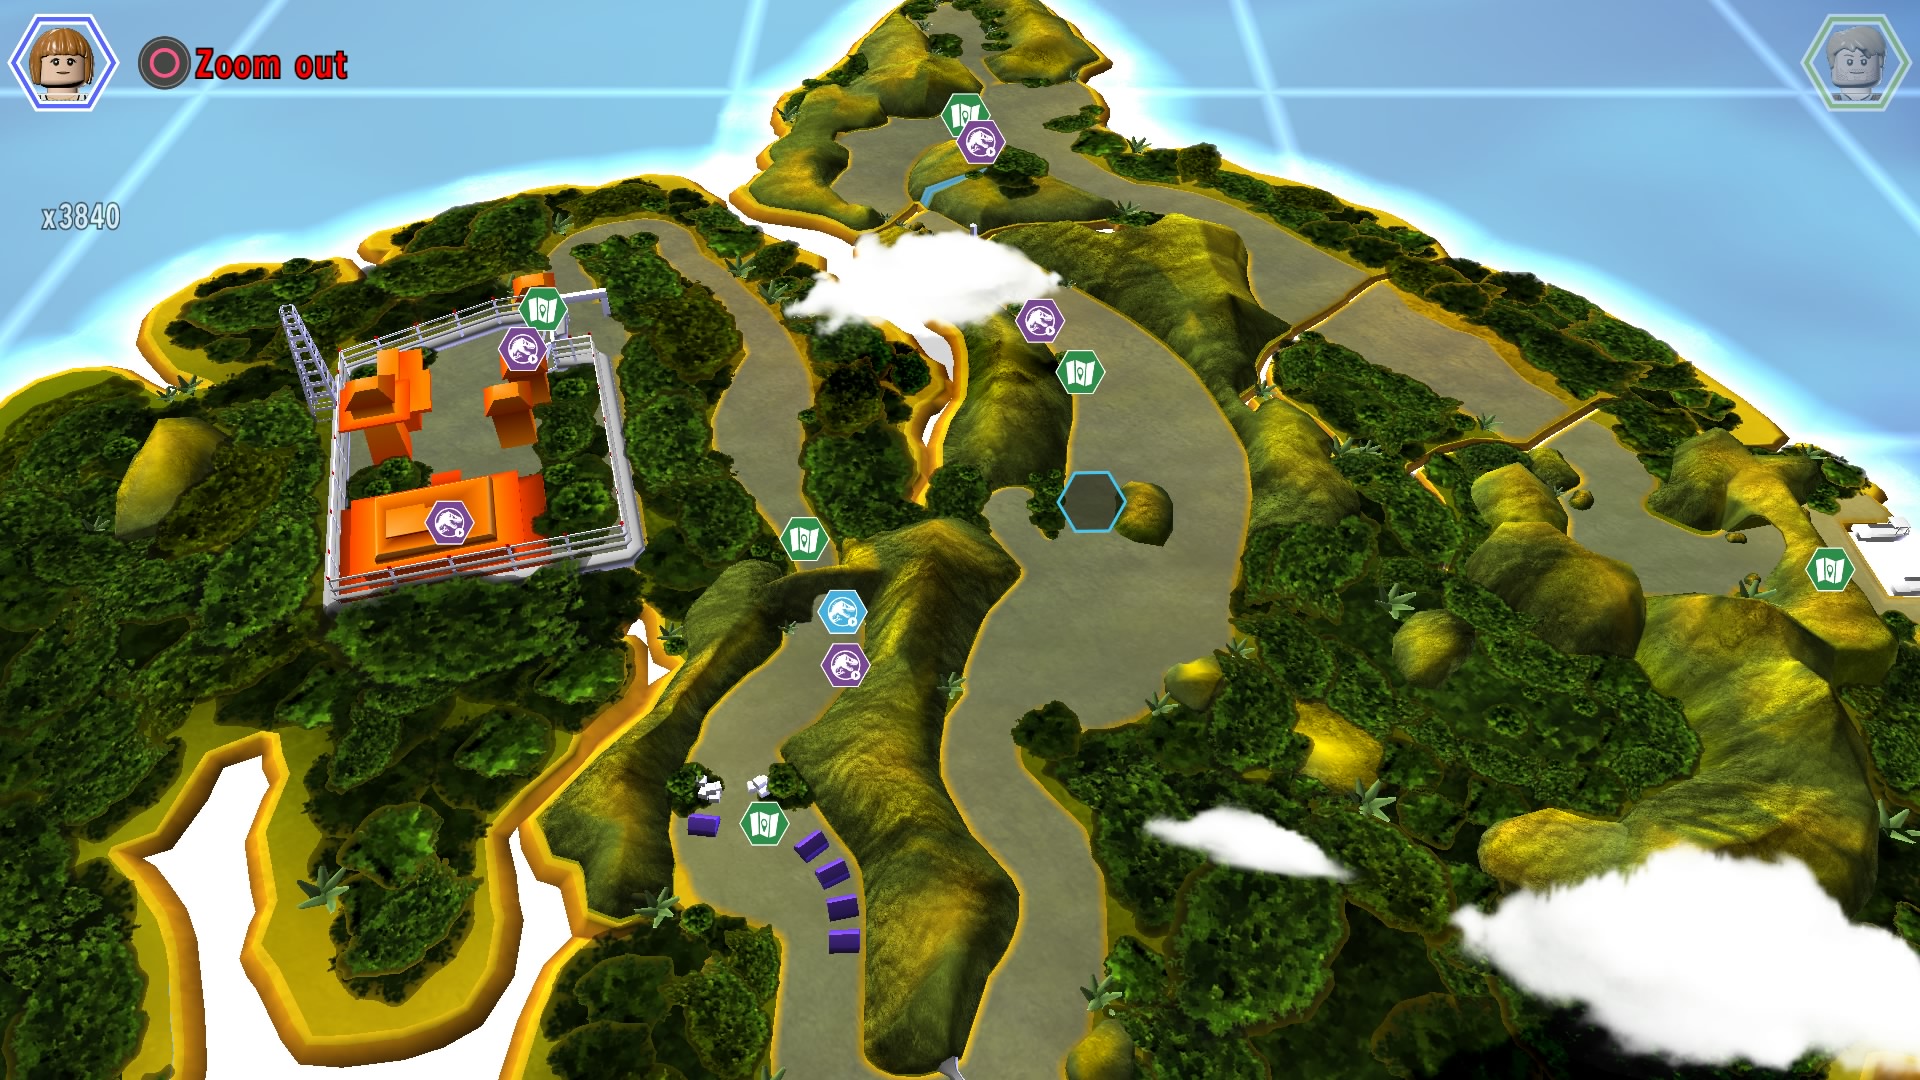
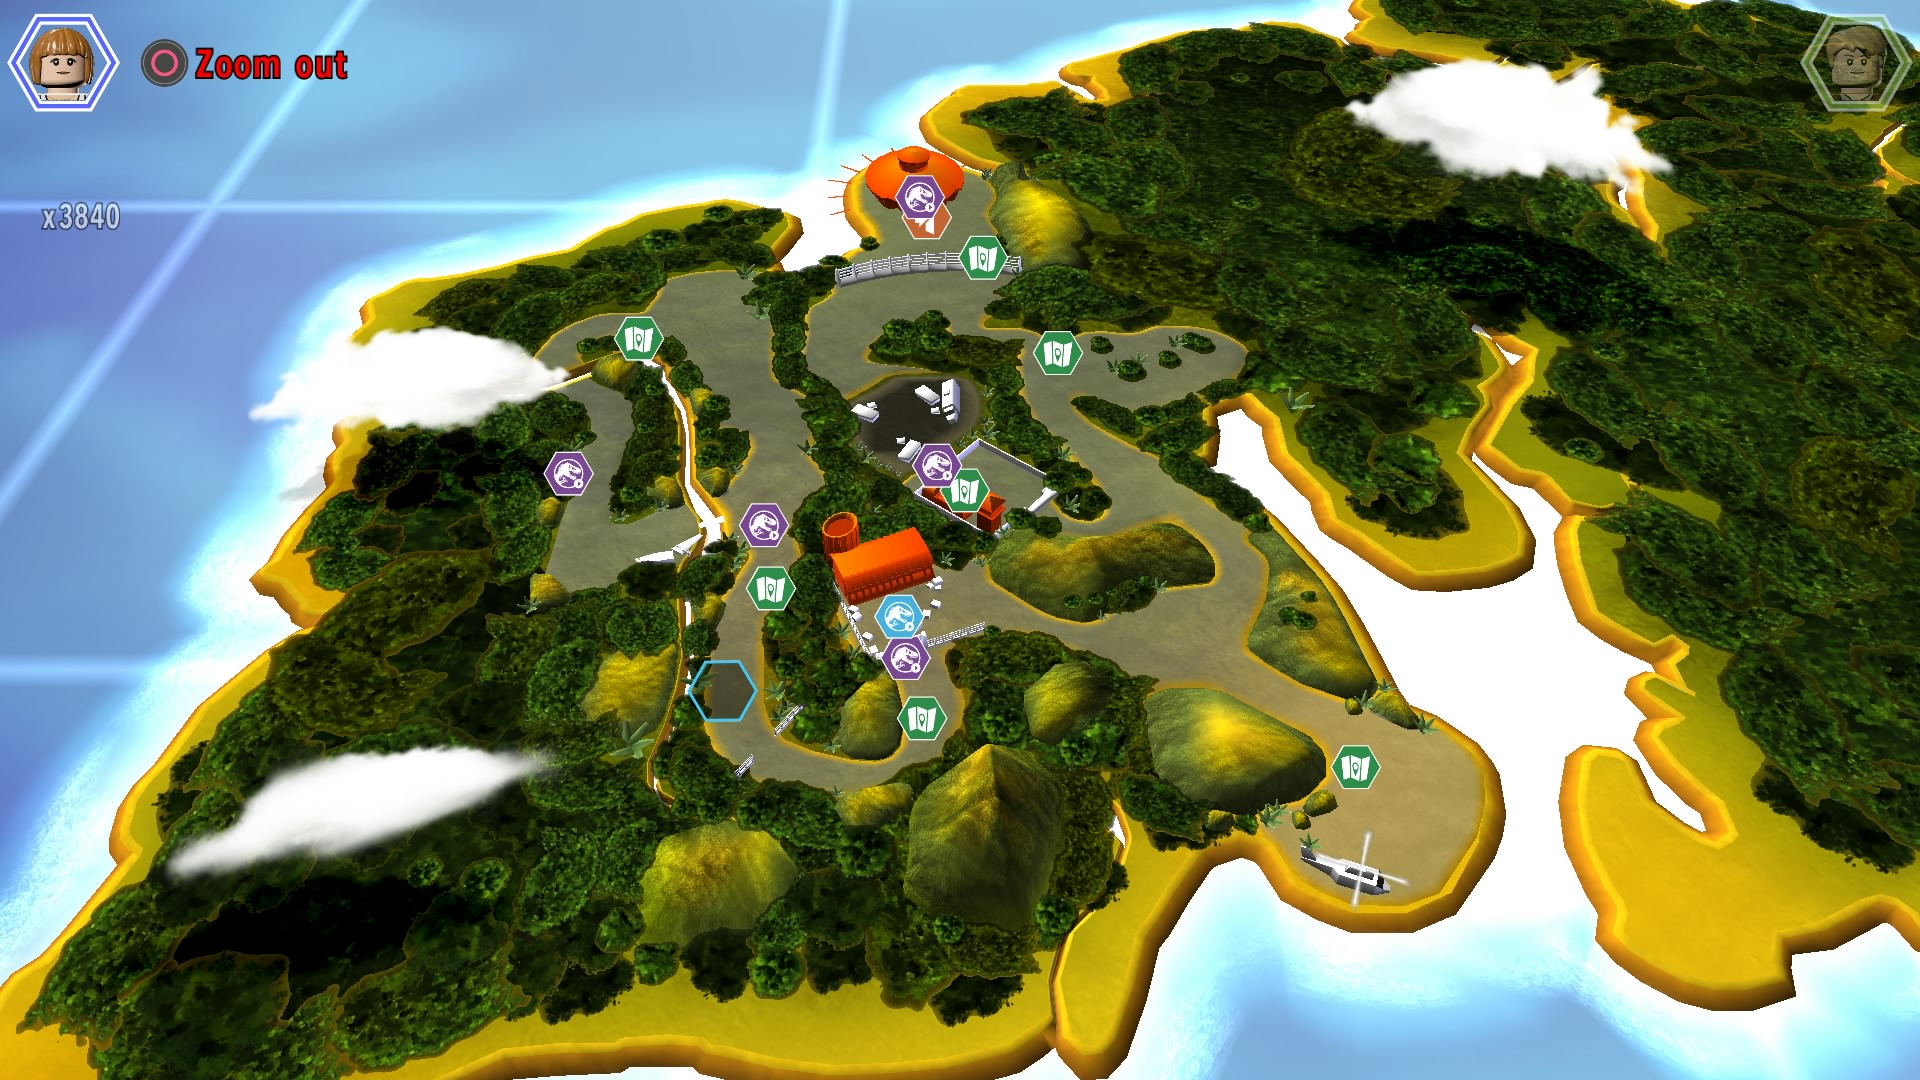
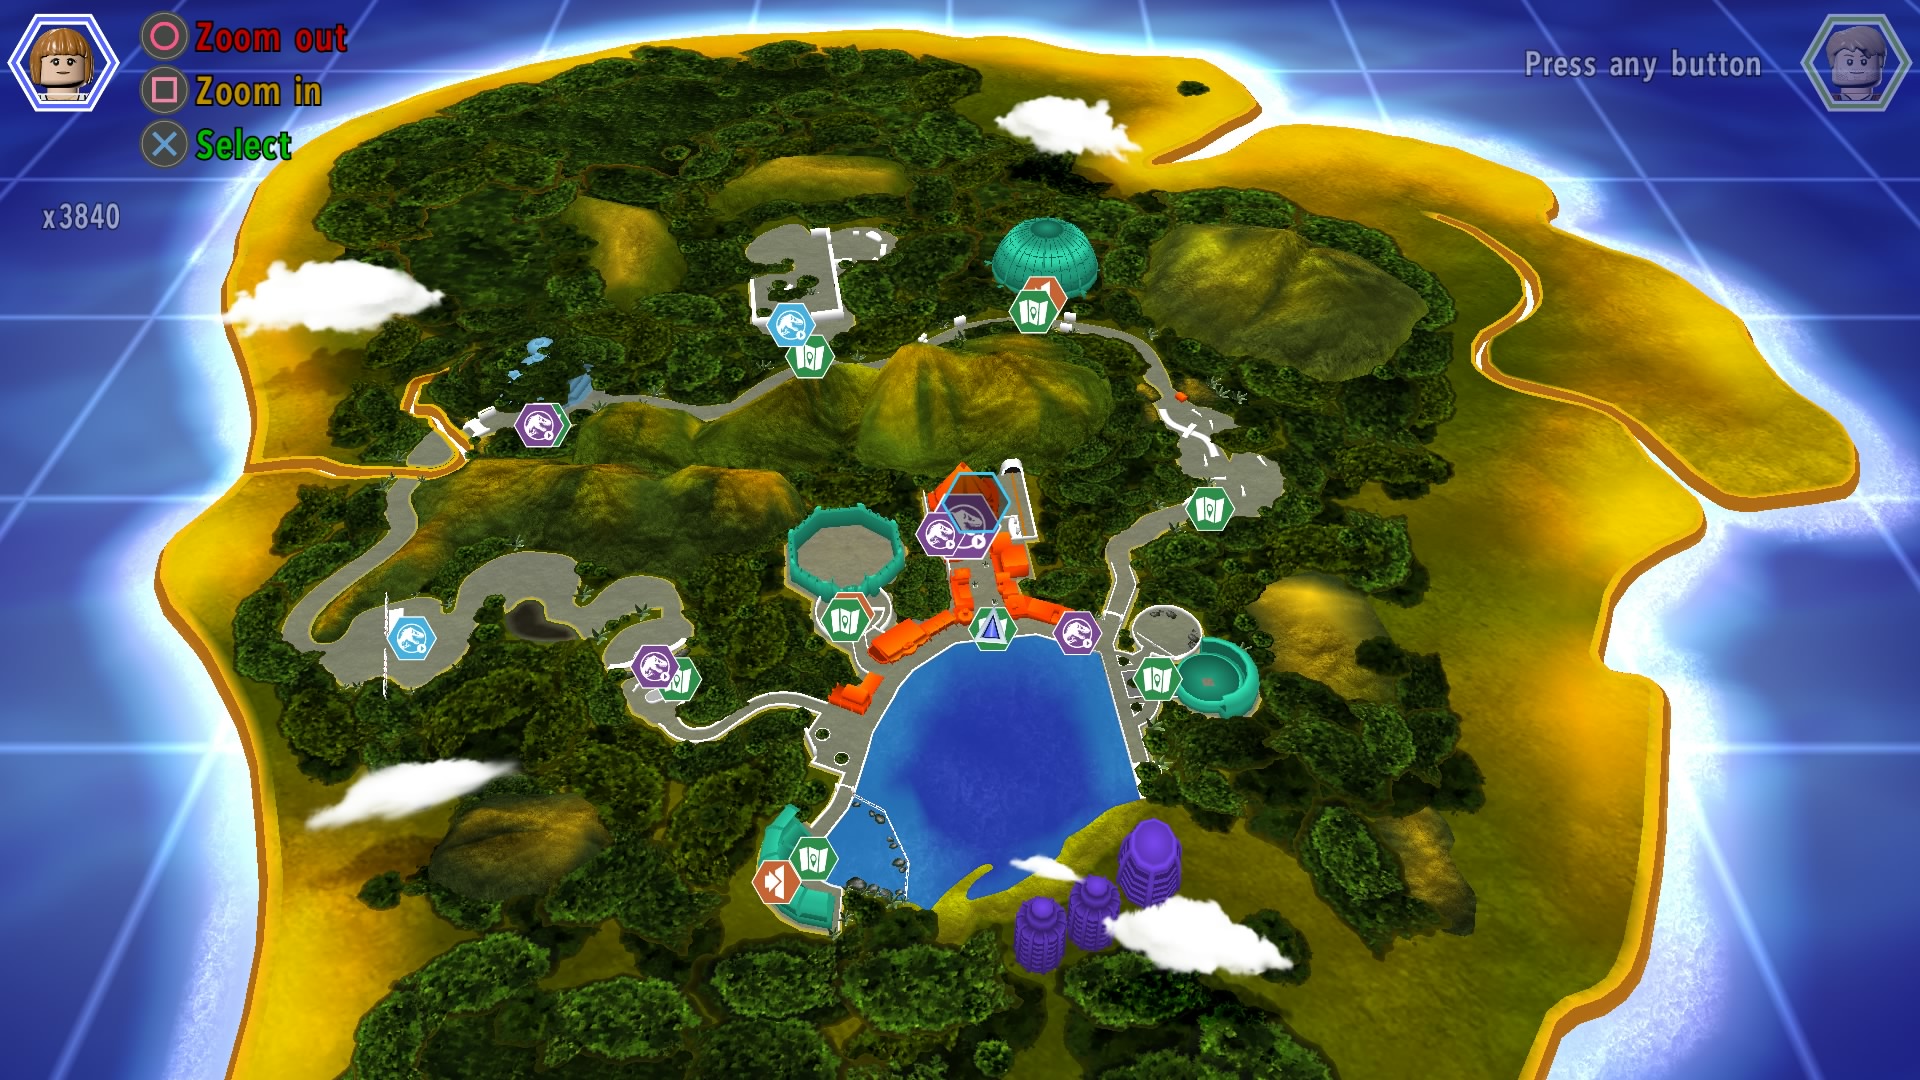

Please refer to the collectible list at the bottom of the page for the location of all Minikits and Amber Bricks in the Story/Free Play levels and all the Free Roam collectibles.
Please refer to the One Big Pile of Bricks Trophy/Achievement for all 20 Red Brick Locations.
One Big Pile of Bricks – Collected all Red Bricks (Silver/20G)
There are a total of 20 red bricks that you will have to collect throughout all four parks in Free Roam. They will be indicated by a Red Brick icon on your map. The easiest way to locate all of them is to interact with the information kiosks around each of the islands. Upon interacting with an information kiosk the locations of all collectibles in that area will appear on your map, making finding all 20 very easy. The locations and costs of all 20 are as follows:
1) X8 Red Brick – (Herbivore Territory Map Point) – Cost = 4,000,000 studs
2) Destroy on Contact – Up the road to the right from the pond in Jurassic World (Safari Plains Map Point) – Cost = 100,000 studs
3) X2 Red Brick – Behind Visitor Center on Isla Nubar, Jurassic Park (Visitor Center Map Point) – Cost = 1,000,000 studs
4) Hybrid Disguises – Just North of Restoring Power Story Mission Replay (Dilophosaurus Map Point) – Cost = 100,000 studs
5) Nedry Disguises – Just east of Restoring Power Story Mission (Gallimimus Map Point) – Cost = 100,000 studs
6) Red Brick Detector – Just north west of Park Shutdown Story Mission (Tyrannosaurus Territory Map Point) – Cost = 200,000 studs
7) Amber Brick Detector – Just east of Eric Kirby Story Mission (Ankylosaurus Map Point) – Cost = 200,000 studs
8) Helium Voices – East of InGen Arrival Story Mission (Stegosaurus Map Point) – Cost = 100,000 studs
9) X4 Red Brick – Just East of the Hunted Story Mission (Hunting Plains Map Point) – Cost = 2,000,000 studs
10) Gold Brick Detector – North of the Hunted Story Mission (Long Grass Map Point) – Cost = 200,000 studs
11) Attract Studs – West of the Park Shutdown Story Mission (Carnivore Territory Map Point) – Cost = 100,000 studs
12) 8 Bit Music – West of the Jurassic Park Story Mission (Triceratops Territory Map Point) – Cost = 100,000 studs
13) X6 Red Brick – Isla Sorna Aviary Map Point – Cost = 3,000,000 studs
14) Fast build – North of The Spinosaurus Story Mission (Spinosaurus Map Point) – Cost = 100,000 studs
15) Fast Interact – East of the Indominus Rex Escape Bonus Level (Gyrosphere Map Point) – Cost = 100,000 studs
16) Collect Ghost Studs – T-Rex Viewing Area (West Boardwalk Map Point) – Cost = 100,000 studs
17) Minikit Detector – (East Boardwalk Map Point) – Cost = 200,000 studs
18) Invincibility – Isla Nublar Aviary Map Point (Requires the Pternandon or Dimorphodon Dinosaur) – Cost = 5,000,000 studs
19) X10 Red Brick – Indominus Territory Map point (Requires the Indominus Rex Dinosaur) – Cost =5,000,000 studs
20) Compy Mode – Mosasaurus Arena Map Point (Requires the Mosasaurus Dinosaur) – Cost = 100,000 studs

Helping Hand – Healed a Dinosaur (Bronze/10G)
Story Related Cannot Be Missed. You will get this on your way to Welcome to Jurassic Park Story Mission.

Survival Expert – Collected “True Survivor” on all levels (Silver/40G)
There are a total of 26 levels that you must achieve True Survivor on, with the help of the x2, x4, x6, x8, and x10 Red Bricks this will come very easily, possibly within seconds. For the locations of the Red Bricks please refer to the One Big Pile of Bricks Trophy/Achievement. There is one True Survivor for each of the 20 story/free play levels, one for each of the 6 bonus chase levels. The stud requirements for each of the levels are as follows:
1) Prologue – 48,000 studs
2) Welcome to Jurassic Park – 60,000 studs
3) Park Shutdown – 88,000 studs
4) Restoring Power – 56,000 studs
5) Visitor Center – 40,000 studs
6) Isla Sorna – 75,000 studs
7) InGen Arrival – 64,000 studs
8) The Hunted – 45,000 studs
9) Communications Center – 69,000 studs
10) San Diego – 60,000 studs
11) Landing Site – 51,000 studs
12) The Spinosaurus – 65,000 studs
13) Breeding Facility – 60,000 studs
14) Eric Kirby – 70,000 studs
15) The Bird Cage – 48,000 studs
16) Welcome to Jurassic World – 120,000 studs
17) Gyrosphere Valley – 50,000 studs
18) Out of Bounds – 80,000 studs
19) Under Attack – 85,000 studs
20) Main Street Showdown – 85,000 studs
21) Tyrannosaurus Rex Pursuit – 45,000 studs ish
22) Tyrannosaurus Rex Escape – 12,000 studs
23) Velociraptor Escape – 12,000 studs
24) Indominus Rex Pursuit – 45,000 studs ish
25) Gallimimus Escape – 12,000 studs
26) Indominus Rex Escape – 25,000 studs

Reason to Fear Man – Defeated 50 Compy Goons (Bronze/10G)
You will more than likely get this just by playing through the story as there are way more than 50 for you to defeat. A few levels actually have compy goons that will continuously spawn until you block the area they come out with, meaning you could theoretically kill all 50 in a single level. If you don’t have this trophy/achievement unlocked by the end of the story then there are still multiple gold bricks in free roam that will require you to kill compys.

We Want To Be Thrilled – Placed a Custom Dinosaur in a Paddock (Bronze/10G)
Once you have created a custom dinosaur, see the Went and Made a New Dinosaur Trophy for the location and how to create one, head to any of the parks in Free Roam and go to one of the large blue pads. Some of the blue pads require a certain amount of gold bricks before you can use them so you may want to save this for later in the game. Once you get to a blue paddock call in your dinosaur and the trophy/achievement will unlock.

The Concept of Attraction – Enabled Stud Magnet Red Brick (Bronze/10G)
The Enable Stud Magnet Red Brick, also known as the Attract Studs red Brick, is found on the Jurassic Park Island in the Carnivore Territory Map Point. Once you have collected and purchased it for 100,000 studs, head to the start menu, go over to extras and scroll down and turn on the Attract Studs Red Brick to unlock the trophy/achievement.

Not Machine Compatible – Tried to use a Hacker Terminal as Alan Grant (Bronze/10G)
Very simple trophy to obtain as long as you know what the game considers a hacker terminal, InGen Access panels and the wifi points do NOT count for this trophy/achievement. A good place to get this trophy/achievement is during the Visitor Center Free Play level, during the Control Room Checkpoint. When you get to the control room you will eventually make it down to a lower level, head down the path to the right and in the corner of the area with the stairs is a hacker terminal that you can have Alan Grant try to hack, as soon as you do the trophy/achievement will unlock.

Pack Hunter – Set both Free Play Characters as Raptors (Bronze/10G)
You will unlock Raptors as you progress through the story levels, specifically from the first level in Jurassic World called Welcome to Jurassic World. Upon completion you should have three different velociraptors unlocked. Once you unlock them switch one of your characters to one of the velociraptors and the second to a different velociraptor and the trophy/achievement will unlock.

Anybody Want a Soda? – As Dennis Nedry, threw a soda can at another character (Bronze/10G)
Dennis Nedry is unlocked upon completion of the Welcome to Jurassic Park Story level but you will still have to purchase him for 100,000 studs before you can use him. To unlock this trophy/achievement it seems that you must throw a soda can at another ENEMY that isn’t a dinosaur, so no throwing it at a second player. Simply go back to any level with an enemy, like InGen Arrival and throw his soda can, press and hold SQUARE, at an enemy to unlock the trophy/achievement.
nbsp;

Remember To Wash Your Hands – Completed a Dropping Rummage (Bronze/10G)
Story Related Cannot Be Missed. You will get this on your way to Welcome to Jurassic Park Story Mission.

Do-You-Think-He-Saurus? – Sneaked past a Dinosaur using Camoflauge (Bronze/10G)
Story Related Cannnot Be Missed. You will get this during the Eric Kirby Story Mission when you first learn about Stealth.

Clever Goal – As a Velociraptor, scored a goal in the Jurassic Park Petting Zoo (Bronze/10G)
Velociraptors are unlocked upon completion of the Welcome to Jurassic World Story Mission. The Petting Zoo is located in the Jurassic World Park on the right side of the island. If you head to the right from the main street map point the first area you come across will have a Petting Zoo sign outside of it. Inside the enclosure there will be a net and a soccer ball. You will actually have to score three goals for a gold brick so you will have to be here at one point or another. The first time I came to this area there wasn’t a goal there so I recommend waiting until you beat the story before attempting to get this trophy/achievement. The controls for moving the soccer ball are pretty terrible so I recommend just pushing it while walking as slow as you possibly can. Once you score your first goal the trophy/achievement will unlock.

Hello John! – Set both Free Play characters as John Hammond (or variant of him) (Bronze/10G)
All the variants of John Hammond will be unlocked just by playing through Story Mode, however you will have to purchase the Lost World version of him. John Hammond Jurassic World will set you back 145,000 studs. Once you have them both unlocked simply switch both of your characters to John Hammond, or the Lost World variant, and the trophy/achievement will unlock.

Building Blocks of Life – Built a LEGO object using Mr. DNA (Bronze/10G)
Mr. DNA costs 500,000 studs to purchase and will become unlockable by playing through the story, once you purchase him all you have to do is build any LEGO object in the game. You can build a bounce pad or rope, etc. etc., so I recommend buying him as early as possible and next time you see something to build while you are collecting everything in Free Roam switch to him and build it for the trophy/achievement.

The Human Piece of Toast – Gave Timmy a Shock (Bronze/10G)
You will unlock Timmy just by playing through the story levels. The easiest way I found to get this trophy is to switch one of your characters to Timmy and the other to Jophery Brown, the guy from the first level who can charge electricity panels, and then simply hit Timmy with his electrical stick, once you do trophy/achievement will unlock.
nbsp;
Lego Jurassic World Collectible Guide
Story/Free Play Collectibles (Minikits/Amber Bricks)
Level 1: Prologue
1) After climbing the first ladder of the game, on the right is a giant light that you can use the handler to charge. (1/3) The second light is just behind the first one. (2/3) The last one is in the back left corner of the same area. (3/3) *Attainable in Story Mode*
2) Just behind the cage, above it are two spotlights, shoot the right spotlight twice for a minikit. *Attainable in Story Mode*
3) On the left side of the area you will see a cage that you can open, you will have to destroy the plants on the door to see the icon to open. Use Nick Van Owens to open the door then Ellie to jump into the poop pile and get you the minikit. *Only Attainable in Free Play*
4) On the left side of the enclosure are 4 red lights, the first two are by the hacking panel and the last two are back by the tower. Simply shoot all four of them for a minikit. *Attainable in Story Mode*
5) After arriving at the Dig Site head to the right and build the first dinosaur, use Ellie to jump over and into the next area. In the bottom of the area are some LEGO’s to destroy, do so and rebuild them. (1/4) In the top left of the area is a rock that you can destroy and rebuild into a sandcastle, to get up there build the dinosaur and then jump up there with Ellie. (2/4) In the area where you have to find the wheels and handle bars to build the machine, in the bottom left corner is another rock to destroy. (3/4) After the helicopter arrives head up to the top area and head right. In front of the trailer is the last rock you need to destroy and rebuild. (4/4) *Attainable in Story Mode*
6) After building the dinosaur in the far right area use Ellie to jump on top of the dinosaur, jump over and grab the minikit. *Attainable in Story Mode*
7) Amber Brick – After building the three dinosaurs and cutting the rope to drop down the boxes, jump up and head down the path. On the left will be a dark cave, enter it to grab the amber brick. *Only Attainable in Free Play*
8) In the area with the helicopter, to the right of it are some great shiny flowers that you can use the raptor claw to break, inside is the minikit. *Attainable in Story Mode*
9) In the far right corner of the same area is a box that Nick Owens can open, open it and build the machine. There are three sand spots that you must run over to get the minikit. The first is right in front of the trailer, the second is by where the truck was parked, and the last one is in front of the helicopter. *Only Attainable in Free Play*
10) To the left of the trailer is a camp that you can use a small character to crawl through. In the new area pick up the item and do the tracking and then destroy the two dumpsters and build the fan. Jump on it and grab the minikit. *Only Attainable in Free Play*
11) Just to the right of the last one, use Claire Dearing to hack the box and grab the minikit. *Only Attainable in Free Play*
Level 2: Welcome to Jurassic Park
1) In the starting area head to the bottom area, where the prologue started, and just to the right of the ladder you will see two cameras that you can shoot. (1/4) (2/4) Just to the left of the yellow machine in the center is the next one. (3/4) The last camera is in the back left corner on the tower. (4/4) *Attainable in Story Mode*
2) In the bottom area on the left side are some Compy tubes you can enter, hit both red switches and the minikit is yours. *Only Attainable in Free Play*
3) On the right side, to the right of the crane, is a poop pile with a minikit in it. *Only Attainable in Free Play*
4) Use the InGen Acess panel, the same one that you used in the Prologue, just to the left of the crane and pick up the minikit that appears. *Only Attainable in Free Play*
5) In the back left corner of the area there is an agility point, pink/blue bar, that any woman can climb over. Inside the enclosure is the minikit. *Only Attainable in Free Play*
6) In the area where you heal the dinosaur water the plant in the top left corner and then enter the dark cave at the top for a minikit. *Only Attainable in Free Play*
7) After healing the dinosaur use it to break the wall on the right side of the area, right next to the tree you built earlier. *Attainable in Story Mode*
8) In the same area as above you will see you rocks that are glowing orange, use the dinosaurs charge attack, hold SQUARE, to break them. The first is on the far left and the second is on the far right. (1/3) (2/3) The last rock is just over the bridge that you create to get the dinosaur across the river. (3/3) *Attainable in Story Mode*
9) After you cross the river on the bottom of your screen will be a red plant you can destroy, do so to reveal a dig spot, inside it is the minikit. *Only Attainable in Free Play*
10) After you open up the first gate in the bottom left of the area is a flower you can destroy. Next use Ellie to water the plant and make the minikit appear. *Attainable in Story Mode*
11) Amber Brick – After opening the second gate and getting the dinosaur through, the top wall has a crack in it that you can break, inside is the amber. *Attainable in Story Mode*
Level 3: Park Shutdown
1) In the bottom right corner of the starting area is a crowbar spot that Nick Van Owen can open, inside is the minikit. *Only Attainable in Free Play*
2) In the bottom right corner of the starting area is a dig spot that Alan Grant can use, build the Lego’s you find. (1/3) In the top left corner up in a tree is a grapple point, use Barry or Kirby to get it down and build the Lego bricks using Alan. (2/3) The last one is in the middle of the area, hidden in some little plants and rocks is a tracking object. Follow the path and build the lego bricks. (3/3) *Only Attainable in Free Play*
3) In the top right corner of the starting area is a water gardening spot that Ellie can use, at the top of the flower is the minikit. *Only Attainable in Free Play*
4) In the bottom left corner is a poop pile with a minikit in it. *Only Attainable in Free Play*
5) Along the broken gate are four red lights, shoot all 4 for a minikit. *Only Attainable in Free Play*
6) When you get to the area where you have to climb the tree to save Timmy, in the back left corner you will see a pig stuck in a tree, use Alan Grant to cut it down and grab a minikit. *Attainable in Story Mode*
7) At the base of the tree is a dark cave with a minikit in it. *Only Attainable in Free Play*
8) When you have to rescue Timmy from the tree in the bottom right corner is a crowbar spot that Nick Van Owen can use, inside is the minikit. *Only Attainable in Free Play*
9) As you climb the tree you will be a bounce pad using bones, as you do it will reveal a crawl hole. Crawl through the hole for a minikit. *Only Attainable in Free Play*
10) When you get to the chase scene immediately switch to the person not driving the car and wait for the T-Rex to open its mouth. Throw 3 flares into its mouth for a minikit. *Attainable in Free Play*
11) Amber Brick – When driving away from the dinosaur stick to the far left and you will find the amber brick. *Attainable in Story Mode*
Level 4: Restoring Power
1) When running away from the T-Rex follow the stud trail and you will have to hop over logs, one of them you hop over will give you a minikit. *Attainable in Story Mode*
2) Also while running down the path there will be three sign posts that you have to destroy. The first one is on the right, second is on the left, and the third one is on the right. *Attainable in Story Mode*
3) Right above where you spawn after the chase is a red light, break it. (1/4) At the bottom of the stairs turn right and above the poop pile is the second one. (2/4) The third one is right above where the tracking object is. (3/4) The last one is after you get through the steam pipe section and go down the stairs. At the bottom instead of turning right go straight and its above the poop pile. (4/4) *Only Attainable in Free Play*
4) Amber Brick – When you have to turn the power on head down the stairs and go right, use Ellie to look through the poop to find the amber brick. *Attainable in Story Mode*
5) Go left down the path and you will see a crowbar point, that Nick Van Owen can open, inside is the minikit. *Only Attainable in Free Play*
6) After you open the door with the key on the right is an electricity charge station, charge it and build the minikit. *Only Attainable in Free Play*
7) After you walk across the pipe on the left behind some boxes is a small crawl hole, on the other side is the minikit. *Only Attainable in Free Play*
8) Head past the steam pipe and down the stairs until you get to a poop pile, behind it is a small crawl hole that you can build with the lego pieces in that corner, crawl through to the new area. Use the Compy to crawl through the green tubes and hit all three red lights to reveal the minikit. *Only Attainable in Free Play*
9) In the same area head up to the top right using the compy, destroy all the boxes and rebuild them for a minikit. *Only Attainable in Free Play*
10) After you turn the power on and head outside, water the plant to continue on with the level. Right above where you watered the plant is a target to shoot. (1/4) This next one is very hard to see, after the dinosaur attacks you it is up in the tree to the left. (2/4) The next one is above the poop pile in a tree. (3/4) Right after walking across the plank, when you get off of it above you will be the last target. (4/4) *Attainable in Story Mode*
11) After you get jumped on by the dinosaur head down the path and there will be a scent trail to follow, at the end will be the minikit. *Only Attainable in Free Play*
Level 5: Visitor Center
1) When you get through all the aisles of the kitchen on the far right is an InGen Terminal that you can access for a minikit. *Only Attainable in Free Play*
2) Go through the door you just opened and build the diorama against the wall for a minikit. *Only Attainable in Free Play*
3) In the same room on the right wall you the game machine for a minikit. *Only Attainable in Free Play*
4) When you’re holding off the dinosaur while rebooting the power on the right above the red and black path are two computer terminals you can shoot down. (1/6)(2/6) The last four are on the left wall to the right and left of the servers. (3/6)(4/6)(5/6)(6/6) *Attainable in Story Mode*
5) Amber Brick – In the back left corner of the same room there is some glass that Lex can break, inside is the amber brick. *Attainable in Story Mode*
6) After you crawl through the small hole head to the far right and up the stairs, shoot the electricity and jump into the room and grab the minikit. *Only Attainable in Free Play*
7) Head back down the stairs and in the back left corner is a hacker terminal, use it and then use the machine to destroy the silver boxes. (1-4/4) *Only Attainable in Free Play*
8) Head down the left until you see the locked gate, use Nick Van Owen to open it and grab the minikit. *Only Attainable in Free Play*
9) At the start of the last section water the dirt and crawl through the gate to get to the next area. In this area there is another water spot to use. (1/2) The second one is over the pink/blue bar on the left, go over and then slide under the next bar to find the next water spot. (2/2) *Only Attainable in Free Play*
10) After you build the ramp to get the other character past the first dinosaur use an agile character to get over the pink/blue bar and you will see a crow bar point behind some lego objects, inside is the minikit, use a woman character to get in there and grab it. *Only Attainable in Free Play*
11) The last one is under the pink/blue bar on the left in the left corner. *Only Attainable in Free Play*
Level 6: Isla Sorna
1) At the start of the level in the top left corner, just to the right of the equation machine, are some lego bricks you can destroy and then some bone lego pieces you can put together. (1/3) In the second area, caged in area, in the bottom right corner just to the right of the stairs is the second item to break and put together. (2/3) The last one is just to the left of the green command center. (3/3) *Only Attainable in Free Play*
2) After you shoot the shelf down to get the tires instead of putting one on the truck on the right, instead wheel it to the slot on the left and crank up a minikit. *Only Attainable in Free Play*
3) After you ride the high hide elevator just up the path is a cabinet that nick van owens can open, inside is the minikit. *Attainable in Story Mode*
4) Just above the last one is an electricity switch you can shoot, wait for the steam to disappear then jump up and follow the path to get the minikit. *Only Attainable in Free Play*
5) In the area with the green command center under the stairs is a electricity switch, shoot it then shoot the ten guys that come out for the minikit. *Only Attainable in Free Play*
6) When you get to the island cross the small stream and above you to the left will be a target you can shoot. (1/3) After you lower the tree branch to climb up to the next area, the second target will be up top right, just next to the other target. (2/3) When you first see the big dinosaurs, in the top left of the area is the last target. (3/3) *Attainable in Story Mode*
7) Across the first stream on the right side is a poop pile to go through. (1/3) Just behind the cutting/chopping machine you build is the second poop pile. (2/3) In the area where you see the two large dinosaurs walk up, the last poop pile is on the bottom of the area. (3/3) *Only Attainable in Free Play*
8) After you get up to the next area by jumping on the mushroom in the dark cave, switch to the baby triceratops or a pachycephalosaurus and break the cracked wall under the tree branch for a minikit. *Only Attainable in Free Play*
9) In the area where you see the two large dinosaurs walk up, on the left is a dig spot. Dig up a tracking item and follow it to get the minikit. *Only Attainable in Free Play*
10) Amber Brick – When you’re fighting the dinosaur there will be a log in the top right corner that you can stand behind. Wait for the dinosaur to do his attack and break it. (1/3) In the bottom middle is a rock that you will need the dinosaur to break. (2/3) The last one is on the far left, get the dinosaur to break it and the amber brick is yours. (3/3) *Attainable in Story Mode*
11) In the same area in the top left corner are some legos you will have to break, rebuild the bone lego pieces and turn the crank. Shoot all four of the duck targets for a minikit. *Only Attainable in Free Play*
Level 7: InGen Arrival
1) At the start of the level to the left of the cage will be a light you can charge with electricity. (1/3) The second one is in the camp just to the right of the fire. (2/3) The last light is in the really big camp area in the top left corner. (3/3) *Only Attainable in Free Play*
2) At the start of the level you will see a dinosaur in a cage, just to the right of it is a car. Jump on the car with sarah and then jump over to the cage and build the minikit. *Attainable in Story Mode*
3) After releasing the big-o-sauraus head into his cage and go through the poop pile for a minikit. *Attainable in Story Mode*
4) After breaking the cracked wall to get into the next part of the camp in the bottom right corner is a wifi hacking terminal, inside the cage is a minikit. *Only Attainable in Free Play*
5) In the top middle of the same area, just to the left of the cracked wall, is a green rock that a Dilophosaurus can break. (1/3) Up in the big part of the camp head to the right corner for rock number 2. (2/3) In the front left corner is the last rock. *Only Attainable in Free Play*
6) Release the two dinosaurs to open up the top left area and use Eric Kirby to clear out the compys. Water the plant to unlock the minikit. *Only Attainable in Free Play*
7) In the top right corner of the same area is a small crawl hole, go through to find the minikit. *Only Attainable in Free Play*
8) When you are climbing back up into the mobile command unit, a minikit will fall down the left side. *Attainable in Story Mode*
9) When you have to switch to another character in the bottom right corner is a dig spot blocked by some plants, dig up the minikit. *Only Attainable in Free Play*
10) Amber Brick – On the left side of the mobile command center are some ledges you can climb to get on top and grab the amber brick. *Attainable in Story Mode*
11) In the bottom left corner of the area is a velociraptor scent trail to follow, at the end it will reveal a water spot which will give you a minikit. *Only Attainable in Free Play*
Level 8: The Hunted
1) As soon as you start running immediately stay to the left and you will grab a minikit. *Attainable in Story Mode*
2) As you’re running away from the T-Rex the camera will change to a horizontal angle and then back to a vertical angle. During this second vertical angle stay to the right to grab the minikit. *Attainable in Story Mode*
3) When the camera changes to you can see the backs of the characters, in the middle will be a minikit that you have to jump to get. *Attainable in Story Mode*
4) As soon as you spawn in the long grass section head left to find a tracking object, follow it to grab a minikit. *Only Attainable in Free Play*
5) Amber Brick – At the start of the long grass section head up the path and there will be a person you can save on the left. (1/5) Continue along the path until you see a dinosaur attack a guy in the middle of the path, use Sarah to take pictures of him and save the guy. (2/5) The next two guys are being guarded by two dinosaurs in the middle of the path. When you get to them go up and go through the poop pile, then build the Lego bricks to save them. (3/5) (4/5) The last one is further along the path, a dinosaur will jump on a guy, simply take his picture to save the guy. (5/5) *Attainable in Story Mode*
6) After you use the lawn mower to get through the plants head left to see a dig spot, build the bones and use the crank for the minikit. *Only Attainable in Free Play*
7) Just after the last one on the bottom should be a path you can walk down, use Eric to clear out the compys and grab the minikit. *Only Attainable in Free Play*
8) After you use Nick van Owens to open the door to the giant tree trunk, enter and go left for a minikit. *Attainable in Story Mode*
9) After you go under the agility point up at the top of your screen in the clearing will be a green and black rock for the dilophosaurus to shoot. *Only Attainable in Free Play*
10) After you save the two guys from the two velociraptors continue down the path then go down, you should see a scent trail, break the lego items if its not there. Follow the path to find the minikit. *Only Attainable in Free Play*
11) Right after the last one head past the glass car spot to the top right. Use Alan to cut the plants, Nick to open the crowbar and Ian to go into the dark cave and grab the minikit.
Level 9: Communications Center
1) At the start of the level in the top left corner are some barrels you can break, build the Lego pieces to find a minikit. *Attainable in Story Mode*
2) Amber Brick – After jumping over the wall you will see a scent trail to follow, do so and build the Lego pieces you dig up at the end. Next shoot the electricity target, then shoot the next target and grab the amber brick. *Only Attainable in Free Play*
3) After jumping over the wall head up the path a little and there will be a bunch of Lego items to break, rebuild the Lego pieces into a sign. (1/3) The second sign will be right in front of you as you exit the garage. (2/3) Just on the other side of the truck that the dinosaur jumps on is the last sign that needs rebuilding. (3/3) *Attainable in Story Mode*
4) Just next to the last sign from above, to the right of the door you need to go through, is a dark room that Ian can walk into and grab a minikit. *Attainable in Story Mode*
5) As you are climbing the tower a raptor will bust through a wall and jump on top of you, walk into the dark room he came from for a minikit. *Only Attainable in Free Play*
6) Further up in the tower before climbing up the blue/pink wall, to the right is a skeleton with a target, shoot it for a minikit. *Only Attainable in Free Play*
7) At the top to the left of the glass cabinet, in the left corner break the lego pieces to reveal a crawl hole. Go through the hole and grab the minikit. *Only Attainable in Free Play*
8) After you slide down the zipline in the back right corner is a fan, hit it and it will spit out a minikit for you to put together. *Attainable in Story Mode*
9) Just next to the fan is a satellite you can repair. (1/3) After you jump across the poles head left to find the second one. (2/3) After sliding down the next zipline it will be right next to you when you land. (3/3) *Only Attainable in Free Play*
10) Just to the right of the last satellite to repair is a target to shoot, climb up and grab the minikit. *Only Attainable in Free Play*
11) In the right corner is a crowbar spot you can open, inside is the minikit. *Only Attainable in Free Play*
Level 10: San Diego
1) At the start of the level in the back right corner is some glass you can break, inside is the minikit. *Only Attainable in Free Play*
2) At the start of the level you will have to save a reporter to continue on with the level, this cannot be missed. (1/3) The second survivor you will have to lift a crate off of, also cannot be missed. (2/3) When you get to the area of the boat where the guard is reaching for the button jump off the boat, towards your screen, and head down the dock to see a guard trapped under the truck. *Attainable in Story Mode*
3) Before getting back on the boat using the anchor instead head to the bottom right corner of the dock and there will be some poles you can jump onto. Follow the path to obtain the minikit. *Attainable in Story Mode*
4) Before jumping on the boat open the cage to grab a minikit. *Only Attainable in Free Play*
5) After getting on the boat head up to the left but don’t open the big door, instead hack the door and head to the front of the ship. In the back left corner is an electricity target for you to shoot for a minikit. *Only Attainable in Free Play*
6) In the same area in the top right corner is an electricity charge station that will give you a minikit. *Only Attainable in Free Play*
7) In the same area on the right wall is a small crawl hole that you can use, at the top repair the horn for a minikit. *Only Attainable in Free Play*
8) Amber Brick – After getting on top of the boat and going along the path you will arrive at the white pyramid looking thing. Just to the right of it is a dark container, inside is the amber brick.
9) As soon as you start driving the car switch characters and every time the T-Rex opens its mouth throw the piece of chicken in it, the third time you do it will give you a minikit. *Attainable in Story Mode*
10) While driving the car after the camera angle changes so you’re behind the car stay to the right and you will get a minikit. *Attainable in Story Mode*
11) Just after the last one continue to stay to the right and you should drive up a ramp and get a minikit. *Attainable in Story Mode*
Level 11: Landing Site
1) As soon as you start to the left will be an extra jump point, jump up and grab the ledge for a minikit. *Only Attainable in Free Play*
2) In the bottom left corner use the dilophosaurus to break the box on the truck for a minikit. *Only Attainable in Free Play*
3) In the top left corner you will see a target you can shoot. (1/3) In the back center is the second one, just to the right of the grapple point. (2/3) The last one is in the far back right corner. (3/3) *Only Attainable in Free Play*
4) On the left corner of the first building is a small crawl hole, go through and use the terminal to get a minikit. *Only Attainable in Free Play*
5) In the bottom/left middle is a scent trail you can follow that will lead to a minikit. *Only Attainable in Free Play*
6) In the back middle to the right of the blue machine is a crowbar point, open it and walk in the dark cave for a minikit. *Only Attainable in Free Play*
7) In the starting area head to the far right corner and you will see a rope you can cut with Alan Grant, climb up and grab the minikit. *Attainable in Story Mode*
8) Amber Brick – At the top of the building, right before you get to Mrs. Kirby, in the back left corner is a pink/blue wall you can climb to grab the amber brick. *Only Attainable in Free Play*
9) At the start of the chase sequence stay to the middle right side and you will grab a minikit. *Attainable in Story Mode*
10) While running away from the dinosaurs there are three longhorn skulls you need to destroy. The dinosaurs will most likely destroy them for you but there is one left, second right, and third is in the middle. *Attainable in Story Mode*
11) While running away from the dinosaurs when the camera switches so you’re running to the right stay toward the top of your screen and you will get a minikit. *Attainable in Story Mode*
Level 12: The Spinosaurus
1) At the beginning of the level, the bottom middle will have a scent trail for you to follow for a minikit. *Only Attainable in Free Play*
2) At the beginning of the level after you save Alan the dinosaurs will break the log for you to get through but there will be a piece of the tree at the top of your screen. Break all of the Lego pieces around the tree stump and there will some for you to rebuild. Use Paul Kirby on the grapple point and jump in the tree to get the minikit. *Attainable in Story Mode*
3) In the starting area head to the far right corner, by the stream and destroy the plants and rocks, build the Legos blocks that appear. (1/3) After walking up the ledge to the next area right when you get off the ramp there will be some lego pieces towards the top of your screen to destroy and rebuild, it has some dinosaur eggs on it. (2/3) After you get catapulted to the new area just to the left of the panel you have to spin is the last dinosaur egg plant thing for you to destroy. (3/3) *Attainable in Story Mode*
4) After you bend the tree back and smack the dinosaur with it, there is a cracked rock that you can use a baby Triceratops to open for a minikit. *Only Attainable in Free Play*
5) When you arrive at the Crash site you will see two targets in the top left corner, the higher one is the one you need to shoot. (1/3) Just above the second parachute point is the second target. (2/3) The last target is in the area after you have to cut the vines, its just above the grapple point. (3/3) *Attainable in Story Mode*
6) When you get up to the top middle where you have to push part of the plane off, there is a grapple point above it that will give you a minikit. *Only Attainable in Free Play*
7) After you cut the luggage down from the tree head up the path it fell down from for a minikit. *Attainable in Story Mode*
8) After you use the parachute for the first time fly across and above you will be an electricity target, shoot it for a minikit. *Only Attainable in Free Play*
9) After you lower the white bridge, in the middle of it is a photograph point, use Billy to take the picture and get a minikit. *Attainable in Story Mode*
10) Amber Brick – After crossing the bridge in the bottom of the area will be a poop pile, go through it and build the lego pieces. Next use a Velociraptor to climb up and grab the amber brick. *Only Attainable in Free Play*
11) Continue on from the last one, go through the tree trunk, in the front right corner will be a crawl hole for you to go through, at the top is the minikit. *Only Attainable in Free Play*
Level 13: Breeding Facility
1) At the start of the level in the top left corner is a car, I shot it with Udesky and it broke but im not sure if it was supposed to or not, build the pieces for a minikit. *Attainable in Story Mode*
2) At the start of the level enter the facility and shoot the four targets above you for a minikit. *Attainable in Story Mode*
3) Amber Brick – In the same room in the front right corner is a ledge you can jump to, at the top follow the ledges around and climb the ladder, climb up the stairs and grab the amber brick. *Attainable in Story Mode*
4) Head through the door and down the hallway into the new room, on the left you will see a Velociraptor ledge, grab it and follow the path down to the end to grab the minikit. *Only Attainable in Free Play*
5) Underneath the stairs is an electricity target to shoot, once the door opens walk into the dark area and grab the minikit. *Only Attainable in Free Play*
6) After you build the bone ladder and climb up there will be a white board in the middle of the back path that you can use to get a minikit. *Only Attainable in Free Play*
7) Just to the right of the last one will be an InGen access panel, use it and then press the button that corresponds to the container that has water in it each time and minikit will pop out. *Only Attainable in Free Play*
8) Head to the right but don’t go down the stairs, head into the room in front of you and access the terminal. Grab all the little dots and the minikit will appear. *Only Attainable in Free Play*
9) Down the stairs you will have to take pictures of some of the dinosaurs, you must take pictures of 4 specific ones. They are as follows: the one to the right of the stairs, the one in front of that one, the one on the left, and the one closest to the door on the right. *Attainable in Story Mode*
10) At the start of the chase sequence stay to the right to grab the minikit. *Attainable in Story Mode*
11) When running away from the dinosaurs when the camera changes and you are running right there will be a minikit in the middle of the path. *Attainable in Story Mode*
Level 14: Eric Kirby
1) After you sneak past the first dinosaur in the back left corner will be a grapple point to pull. *Only Attainable in Free Play*
2) When you get to the area where you have to sneak past the second raptor, switch to the DILO and shoot the left corner of the truck for a minikit. *Only Attainable in Free Play*
3) When you get to the area with the sick dinosaur in the middle tower is an electricity switch. After you shoot that a target will appear in the sky just to the left, shoot that for a minikit. *Only Attainable in Free Play*
4) After you fight off the raptors with the dinosaurs head to the top left corner and break the big container, inside is the minikit. *Attainable in Story Mode*
5) After you throw the raptor through the door hop over the poles and a dig spot will be on the bottom of your screen. After you complete the first one another one will pop up, do that one and then do that last one that pops up for a minikit. *Attainable in Story Mode*
6) At the top of this little island is a water spot, use it and jump across to get the minikit. *Only Attainable in Free Play*
7) After you exit the hideout and cross the river, use Eric to hit the target up top left for a minikit. *Attainable in Story Mode*
8) Head up to the next level and to the left of the ramp will be and adventure wall to climb, at the top use the baby triceratops to break the wall. Inside the dark cave is the minikit. *Only Attainable in Free Play*
9) As you continue along the level you will build a ramp to get to a new area, continue to the next area past the groups of compies until you come to an area where you have to throw a character up to the next level. In the back right corner is a crawl hole for Eric, go through it and then sneak past the dinosaur to get the minikit. *Attainable in Story Mode*
10) On the level above the last one head to the left and parachute to the left and you will see a scent trail, follow it for a minikit. *Only Attainable in Free Play*
11) Amber Brick – Just to the left of the last minikit there is an agility bar you can climb over. Next use the Velociraptor to open the container and grab the amber brick. *Only Attainable in Free Play*
Level 15: The Bird Cage
1) At the start of the level head straight and go right, at the gap you will see a target to shoot. (1/3) After you scare the bird with the rocket head to the bottom right corner to find the second target. (2/3) Continue past the diving board you built to find the last target. (3/3) *Only Attainable in Free Play*
2) After you cross the gap by swinging on the poles, lower the cage and behind where the wall was is a dark cave with a minikit in it. *Only Attainable in Free Play*
3) Amber Brick – After you drop the box on the bird use the watering spot that he was standing on and jump up. Follow the path all the way to the left to grab the amber brick. *Only Attainable in Free Play*
4) Head back to where you just were and there will be a yellow container that you can use a crowbar to open. *Only Attainable in Free Play*
5) Continue along the path until you see the compy tube, head up and through the maze to get the minikit. *Only Attainable in Free Play*
6) Just past the diving board continue down the path and the minikit will be in a box. *Attainable in Story Mode* *Make sure you get this one before going onto the diving board*
7) As you continue on with the level you will have to build a diving board and then fly off with Billy, stick to the middle of the circles of studs for a minikit. *Attainable in Story Mode*
8) When you start in the boss area in the bottom left corner is a scent trail to follow for a minikit. Just past the diving board continue down the path and the minikit will be in a box. *Only Attainable in Free Play*
9) When you’re fighting the dinosaur you will have to hop on a gun, instead of shooting the barrels shoot the 4 buoys. (1-4/4) *Attainable in Story Mode*
10) After you get onto the station on the right, in the right corner will be a small crawl hole with a minikit on the other side. Just past the diving board continue down the path and the minikit will be in a box. *Only Attainable in Free Play*
11) Climb up to the top by the crane but don’t use it yet, head up on top of the roof and build the Lego bricks for a minikit. *Attainable in Story Mode*
Level 16: Welcome to Jurassic World
1) Head to the far right of the starting area, to the left of the tent along the wall will be some Lego bricks to destroy and rebuild into a minikit. *Attainable in Story Mode*
2) On the very far right you will see a truck that has a crowbar spot to open, inside is the minikit. *Only Attainable in Free Play*
3) Inside the tent use the terminal to call in a minikit. *Only Attainable in Free Play*
4) When you are chasing after the pig, after he goes through the pig hole, clear the lego pieces in front of the cage and head on through and go left to get the minikit. *Attainable in Story Mode*
5) When you get to the area where there is a camera that you have to destroy, in the left corner is a green/black rock that you need a DILO to destroy. *Only Attainable in Free Play*
6) When you get the dinosaurs back to the circle room, destroy all of the red Lego bricks on the right and build them together. Once the dinosaurs drag the pig back down head to the right and build the minikit. *Attainable in Story Mode*
7) Head straight when you get inside the paddock and down the hill you will see a cracked wall, open it and head into the new area. In the area use the terminal on the left, solve the puzzle, then use the white board that appears to get the minikit. *Only Attainable in Free Play*
8) In the same room use the compy tubes on the right to raise the platform and grab the minikit. *Only Attainable in Free Play*
9) Continue on with the level until you climb over the tree trunk and get to the water well. Behind the well will be a dark cave, you will have to use Timmy to get this one since he can build bones and light up dark areas. Once you build the light use the grapple point to get the minikit. *Only Attainable in Free Play*
10) When you get to the part where you see the claw marks you will have to take three photographs, the first is of the claw marks. (1/3) The second is up the path, to the left of the electricity charge station, the marks on the wall. (2/3) The last photo spot is in the back right corner, next to the wifi spot. (3/3) *Only Attainable in Free Play*
11) Amber Brick – After you create the robot bunny head down to the right and use the supervisor to open the cage and grab the amber brick. *Attainable in Story Mode*
Level 17: Gyrosphere Valley
1) During the chase sequence you will have to destroy three sign posts. There locations area as follows: Right, Left, Top. They are kinda hard to get so it may take you a time or two to get them all. *Attainable in Story Mode*
2) Amber Brick – As you are rolling away from the dinosaur when the camera changes so you are rolling to the right stay to the top of your screen. You will eventually go up a ramp, jump to another ledge and then pick up the amber brick. *Attainable in Story Mode*
3) At the start of the new area destroy the cracked rock on the left for a minikit. *Only Attainable in Free Play*
4) In the top left corner is a grapple point you can use, at the top is a minikit. *Only Attainable in Free Play*
5) In the next level up, cut the vines on the rock in the bottom left corner and shoot across on the gyrosphere, the minikit is on the left. *Only Attainable in Free Play*
6) In the top right corner there is a green/black rock that a DILO can shoot for a minikit. *Only Attainable in Free Play*
7) Roll over the see saw ramp thing and below it in the stream will be a crowbar point, open it for a minikit. *Only Attainable in Free Play*
8) Just to the right of the last one, by the tree, build the bone bouncy pad and climb the tree. At the top go left and glide off to get the minikit. *Only Attainable in Free Play*
9) After sliding down the zipline head to the bottom of the screen and in the middle will be a dig spot. Dig it up and use the panel to get the minikit. *Only Attainable in Free Play*
10) In the next area in the far right corner is a wifi panel that will give you a minikit. *Only Attainable in Free Play*
11) In the left corner, a little behind the tree, is a water spot that will give you a minikit. *Only Attainable in Free Play*
Level 18: Out of Bounds
1) On the far left of the room will be an InGen Panel, use it and defeat the 12 compys for a minikit. *Only Attainable in Free Play*
2) After you go through the compy tube head to the top middle of the area and use the crowbar point to get the minikit. *Only Attainable in Free Play*
3) Head outside and on the right there is a poop pile with a minikit in it. *Only Attainable in Free Play*
4) On the far right side in a tree is a target, it will drop a tracking object. Follow the path to get a minikit. *Only Attainable in Free Play*
5) In the back middle there is an adventure wall you can climb, go into the cave in the right side and grab the minikit. *Only Attainable in Free Play*
6) As soon as you gain control of Owen and Claire use Owen to go through the poop pile at back of the room to find the pieces of a minikit. *Attainable in Story Mode*
7) In the same area on the right wall there is a hole you can walk into that has a minikit. *Attainable in Story Mode*
8) Continue down the path, walk past the scaffolding and in the bottom right corner there is a tracking object, follow the path to get the minikit. *Only Attainable in Free Play*
9) Amber Brick – In the center of the area there is a flower on the right wall that you can shoot, it seems you are only able to hit it with a gun. (1/3) Follow the path the butterfly takes to see it land on the flower on the right. (2/3) The last target is just a little further over to the left than the last one. (3/3) *Only Attainable in Free Play*
10) Continue on with the level until you have to have Claire climb up the purple/blue wall. Instead of doing that head to the back left corner and use Owen to cut the rope and build the minikit. *Attainable in Story Mode*
11) After you make the T-Rex sneeze build the agility bar, slide under and use the crowbar spot for the minikit. *Only Attainable in Free Play*
Level 19: Under Attack
1) As soon as you start the level you will see a green/black rock in front of the ice cream shop. (1/3) The second one is in the coffee shop when you switch to the other set of characters. (2/3) The last one is just to the right of the arcade behind a car. (3/3) *Only Attainable in Free Play*
2) Switch to the other set of characters and use the crowbar spot in front of the theater, bust up the popcorn machine to get the minikit. *Only Attainable in Free Play*
3) Amber Brick – After you build the bridge to get over the electricity there will be a clothes store that Zara can slide into, inside is the amber brick. *Attainable in Story Mode*
4) Continue down the path at the top of your screen underneath the balcony you will see a small crawl hole, use it and in the right corner is a poop pile with a minikit. *Only Attainable in Free Play*
5) Open the arcade on the left side, once inside you the panel on the right to get the minikit. *Only Attainable in Free Play*
6) Head to the right from the last one and walk around the truck that is right next to the fire, behind the truck is a water spot. Use the water spot and climb the vines to get the minikit. *Only Attainable in Free Play*
7) When you get to the new area as soon as you clear the first barrier use the water spot to grab the minikit. *Only Attainable in Free Play*
8) Continue heading right and you will eventually see a cracked LEGO wall, inside is the minikit. *Only Attainable in Free Play*
9) After you sneak past Delta head to the far right and go through the poop pile to find a minikit. *Attainable in Story Mode*
10) From the last one use the grapple point to head up to the next area, then clear out the raptor on the right side. Next head far left and use the scent trail to find the next minikit. *Only Attainable in Free Play*
11) In the second part of the raptor pursuit, switch to the driver and stay to the top of the screen to get the minikit. *Attainable in Story Mode*
Level 20: Main Street Showdown
1) At the start of the level to the left will be a blue panel Claire can use, once she does a minikit will pop out of the vending machine to the left. *Attainable in Story Mode*
2) Amber Brick – Just to the right of where you spawn is an InGen access panel, use it and enter the new area. As soon as you enter the room you will see a camera you have to stealth past, do so and use the panel in the room to get the amber brick. *Only Attainable in Free Play*
3) In the same area head to the left and use the white board to get a minikit. *Only Attainable in Free Play*
4) Head into the next room on the left and use the terminal to get the minikit. *Only Attainable in Free Play*
5) Head into the next room and destroy all the lego bricks and then build them to get the minikit. *Only Attainable in Free Play*
6) Head back outside to the main area and head to the right until you see a gold wall, on the left side of it is a dig spot that contains a minikit. *Only Attainable in Free Play*
7) On the right side destroy the bench and rebuild it to discover a raptor point. Use the point to open the door and head inside and hit the switch to turn on the power. Next use the small crawl hole and head up top, on the right break the glass to get the minikit. *Only Attainable in Free Play*
8) On the left side of the street use a dinosaur to charge the door and grab the minikit. *Only Attainable in Free Play*
9) While you are on the gun shooting the T-Rex there are three birds you can also shoot, 1 on the left, one back left, and one on the right. They are all on the edges of buildings. *Attainable in Story Mode*
10) After the second T-Rex comes out and you’re in the new area head to the bottom right corner and you will see a vending machine that needs to be repaired, fix it to find a minikit. *Attainable in Story Mode*
11) Just above the last one you will see a poop pile you can go through for another minikit. *Attainable in Story Mode*
Free Roam Collectibles
Jurassic Park
Isla Nublar/Brachiosaurus Plains Kiosks
Visitor Center Kiosk
Raptor Territory Kiosk
Jurassic Park Gate Kiosk
Dilophosaurus Territory Kiosk
Triceratops Territory Kiosk
Tyrannosaurus Enclosure Kiosk
Herbivore Territory Kiosk
East Dock Route Kiosk
Carnivore Territory Kiosk
Gallimimus Territory Kiosk
Tyrannosaurus Territory Kiosk
Stegosaurus Territory Kiosk
Mobile Lab Site Kiosk
Hunting Plains Kiosk
Hunter Camp Kiosk
Long Grass Kiosk
Communication Center Kiosk
InGen Compound Kiosk
Crash Site Kiosk
Spinosaurus Territory Kiosk
Eric’s Hideout Kiosk
Ankylosaurus Territory Kiosk
Isla Sorna Aviary Kiosk
Tour Route Exit Kiosk
Main Street Kiosk
East Boardwalk Kiosk
West Boardwalk Kiosk
Mosasaurus Arena Kiosk
Gyrosphere Valley Kiosk
Shady Grove Kiosk
Safari Plains Kiosk
Isla Nublar Aviary Kiosk
Indominus Territory Kiosk
Here you go guys our LEGO Jurassic World Trophy/Achievement Guide. If you have any questions or comments about this guide, the game in general, or anything in general, feel free to ask them on Facebook, Twitter, Google+, Youtube, or in the comments below and we will do our best to get back to you as soon as possible. While you’re on the above pages be sure to like us, follow us, and subscribe to us to stay up to date on the latest news and information that we have for you guys. Also be sure to follow us on Twitch so you will know when we livestream and on Instagram so you can see all our awesome pictures. We hope you find this guide useful and are enjoying the game!!!